Welcome Enjoy Tutorials

Liked us?

Showing posts with label Blogger (service). Show all posts

Sunday, April 28, 2013

One Tip Solution To Solve Google Sitemap Feed Proxy Errors

Most or all know how to submit your blog sitemap to Google if not you can Google for it and can find a lot of tutorials on this single topic but something that most of you might have observed are the Google Sitemap Errors! How do you solve them? Why so many errors when you have done everything the right way? The answer is simple , read on.
What actually happens is the fact that most bloggers burn their feeds at feedburner despite the default Atom feed system provided by Blogger. So most bloggers have redirected their default feeds to feedburner as shown below,

redirecting-site-feed
When we submit our RSS or Atom feeds at Google Webmaster Tools Site we are actually submitting the redirected feed hosted by feedburner. The disadvantage of doing so is that when Google Robot crawls your blog it basically indexes the data provided by the default BlogSpot feed system but since you have redirected your default feeds to feedburner, Google robot has to contact two feed systems at a time! first from BlogSpot and then from Feedbuner and thus it turns out into a confusion and results as Feed Proxy Errors which is surely a headache for every newbie blogger. Unfortunately the internet has almost rare tutorials on this issue. The reason behind doing a professional SEO course was indeed learning how to solve all such problems. Luckily I have come up with a solution.
The mistake everyone makes is by adding the following sitemap data,
http://YOURBLOGNAME.blogspot.com/rss.xml
OR
http://YOURBLOGNAME.blogspot.com/atom.xml
But this results in dozens of feed proxy errors. To solve this issue simply submit the following sitemap data,
http://YOURBLOGNAME.blogspot.com/feeds/posts/default?redirect=false
Note:- You only need to add feeds/posts/default?redirect=false  because your blog URL will be added by default.
where , feeds/posts/default?redirect=false is the code that redirects Google only to the default BlogSpot Atom Feed system.
Finally the results for your blog will look like that for mine,
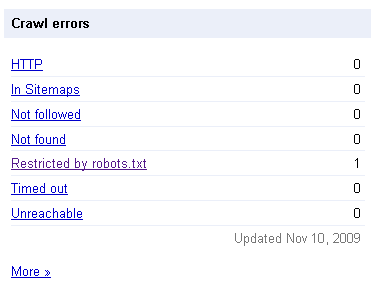
crawl errors
fully-indexed
Impressive isn’t it! Adopt the right method and you will see a positive change too. Search Engine do really count for 75% of the traffic to your blog so make sure you smoothen the path for them by optimizing your sitemap as guided in today’s post.
Enhanced by Zemanta

Saturday, March 30, 2013

The Trick to Change Image On Blogger

How to make an image clickable?

The complete clickable image code looks like this,
<a href="LANDING URL" target="_blank">Image LINK" width="" height=""  alt=""  title="" border="0" /></a>


  • Where refers to where will the image take the user when it is clicked.
  • Where IMAGE LINK refers to the URL of your picture
  • width="" and height="" has to be given proper values in pixels
  • alt="" is alternative text tag that you right to tell search engine robots what the image is about
  • title="" is the name of the image that appears on mouse hover. It is always kept the same as the alt=""
  • border="0" ensures that no border or outline appears across the image
For example for the image below I have used the following code,
<a href="http://tricksblogspot.blogspot.com/" target="_blank"><img src="IMAGE LINK" width="240px" height="180px"  alt="Clickable Horse image" title="Clickable Horse image" border="0" /></a>


When you click the image, it will take you to our homepage. Else if you want to link to the original size of image then use this code,


<a href="IMAGE LINK" target="_blank"><img src="IMAGE LINK" width="240px" height="180px"  alt="Clickable Horse image" title="Clickable Horse image" border="0" /></a>
Clicking the image below will show you its original size.
world globe


How to make the same image un-clickable?

To make any image un-clickable simply remove the href linking tag. After removing the landing address tag we get,
<img src="IMAGE LINK" width="" height=""  alt=""  title="" border="0" />
You will see that the image is no more clickable. and the code I used this time is the same one but without the href tag,
<img src="IMAGE LINK" width="240px" height="180px"  alt="unclickable Horse image" title="unclickable Horse image" border="0" />


unclickable Koala image


How to make an image fade in and fade out?

For this you will need to add a tiny CSS3 code to your template. So kindly follow these steps,
  1. Go To Blogger> Design > Edit HTML
  2. Backup your template
  3. Search for ]]></b:skin>
  4. Add the code below just above it


/*---MBT FADE OUT CODE ----*/
.Fadeout img {
filter:alpha(opacity=100);
opacity: 0.3;
border:0;
}
.Fadeout:hover img {
filter:alpha(opacity=30);
opacity:1.0;
border:0;
}
/*---MBT FADE IN CODE ----*/
.Fadein img {
filter:alpha(opacity=30);
opacity: 1.0;
border:0;
}
.Fadein:hover img {
filter:alpha(opacity=100);
opacity:0.3;
border:0;
}


    5.  Save your template.


Now whenever you wish to add the fading effect to your image then simply insert an additional code to the same Clickable image code that we discussed above.
To make the image Fade out simply insert class="Fadeout" to your image code like this,
<a class="Fadeout" href="LANDING URL" target="_blank"><img src="IMAGE LINK" width="" height=""  alt=""  title="" border="0" /></a>

See an example below. (Hover your mouse cursor on it)


To make the image Fade in simply insert class="Fadein" to your image code like this,
<a class="Fadein" href="LANDING URL" target="_blank"><img src="IMAGE LINK" width="" height=""  alt=""  title="" border="0" /></a>

See an example,


I hope you find it useful. If you wanted to know where to save your images or to get IMAGE Links then read this post,
Enhanced by Zemanta

Botones Isometricos de Social Media


Barra Lateral Fija