Welcome Enjoy Tutorials

Liked us?

Showing posts with label Uniform resource locator. Show all posts

Tuesday, April 30, 2013

QR Codes. What are, what they are and how to add them to the blog

QR codes (Quick Response) barcodes are able to store certain types of information such as a URL, SMS, Email, Text, etc.. However, I can not use the word again as these codes were created in 1994, but, thanks to the rise of the new (now if) SMARTHPHONE smartphones or these QR codes are again very very fashionable.


It's funny how every day without hardly realizing it, many of our daily activities like shopping, gym, to the movies ... the parking and many are managed quickly and accurately through codes bar. This will also happen with this code whose use at this time is innovative and very common soon will find it everywhere.


Creative business card with a QR code included
Here's an example, ... a business card .. if, if the lifetime. Well, if you say you can generate a QR code and encode in a URL for example to your blog or website and that when this code as printed on your business card is scanned by the camera causes a SmartPhone connect the phone directly to the website.


Another example is to create a QR code with your personal information (vCard), when read with the teléfomo, contact details of your card will like a magic trick is trying to phone contacts .... just wonderful fast, direct and without typing anything. By including this QR code into the design of your business card you've become an interactive object.

It is best that you see with your own eyes. The first video, it shows the different real-world applications that are already making this code. The second shows you a LG marketing campaign based on the use of such codes.

Video example of applying multiple uses QR codes:


What kind of information can be stored in QR codes?
Here the list of what you can store in a QR code:

    Contact (vCard). Name, company, phone, address ...
    A web address (URL). For example the blog, to the web or even your profile on Facebook, Twitter, Linkld, Youtube, etc..
    An email address.
    A message like SMS.
    A phone number to make a call.
    A text up to 350 characters
    Parameters wireless network access.
    Data from an event to a calendar (date and time of start / end event name ...)
    A Geolocation to see it on a map.

How I can generate a QR code?

There are many free online services. Below is a list of the ones I tested and I liked (all are in English):

    Zxing. It is clear, simple and allows you to download QR code generated
    QR4. Very flexible and can download the code vector file. Very professional
    Delivr QR Code Generator. It has everything you need, very clear interface.


What happens when read with mobile QR code?

When your SmartPhone read the QR code will cause an action according to the type of information stored in the code, ie connect to a web address or send an SMS message, create a calendar event, make a phone call, etc. .
Post. Your SmartPhone (Android, iPhone, BlackBerry) must have software to scan the code.

Now I have my QR code generated. Now what?

    Include it in your print ads, business cards, etc..
    Post it on the web or on the blog. Will achieve capture the attention of your visitors.
    Open your mind ... the possibilities are endless (see recommended readings)

Are you a marketing professional?
During the time I've been mulling over this topic, I came across QRky company that has an entire online platform available in Spanish, aimed at professionals. This service allows you, create your QR codes, know the statistics of the time in which the code has been read, where they read a map represented within. Also one of the errors "frequently" is once the code is printed on thousands of business cards, it should point to another web address, or the message that carries coded has a misspelling. With this platform you can create a universal QR code and switch the action without having to generate a new code.
You can evaluate QRky service completely free for a limited time getqrky.com

Sunday, April 28, 2013

One Tip Solution To Solve Google Sitemap Feed Proxy Errors

Most or all know how to submit your blog sitemap to Google if not you can Google for it and can find a lot of tutorials on this single topic but something that most of you might have observed are the Google Sitemap Errors! How do you solve them? Why so many errors when you have done everything the right way? The answer is simple , read on.
What actually happens is the fact that most bloggers burn their feeds at feedburner despite the default Atom feed system provided by Blogger. So most bloggers have redirected their default feeds to feedburner as shown below,

redirecting-site-feed
When we submit our RSS or Atom feeds at Google Webmaster Tools Site we are actually submitting the redirected feed hosted by feedburner. The disadvantage of doing so is that when Google Robot crawls your blog it basically indexes the data provided by the default BlogSpot feed system but since you have redirected your default feeds to feedburner, Google robot has to contact two feed systems at a time! first from BlogSpot and then from Feedbuner and thus it turns out into a confusion and results as Feed Proxy Errors which is surely a headache for every newbie blogger. Unfortunately the internet has almost rare tutorials on this issue. The reason behind doing a professional SEO course was indeed learning how to solve all such problems. Luckily I have come up with a solution.
The mistake everyone makes is by adding the following sitemap data,
http://YOURBLOGNAME.blogspot.com/rss.xml
OR
http://YOURBLOGNAME.blogspot.com/atom.xml
But this results in dozens of feed proxy errors. To solve this issue simply submit the following sitemap data,
http://YOURBLOGNAME.blogspot.com/feeds/posts/default?redirect=false
Note:- You only need to add feeds/posts/default?redirect=false  because your blog URL will be added by default.
where , feeds/posts/default?redirect=false is the code that redirects Google only to the default BlogSpot Atom Feed system.
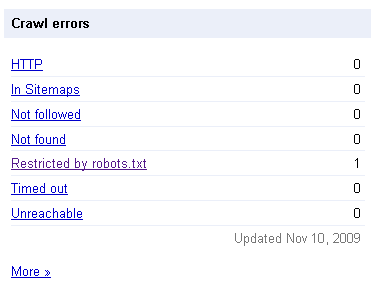
Finally the results for your blog will look like that for mine,
crawl errors
fully-indexed
Impressive isn’t it! Adopt the right method and you will see a positive change too. Search Engine do really count for 75% of the traffic to your blog so make sure you smoothen the path for them by optimizing your sitemap as guided in today’s post.
Enhanced by Zemanta

Tuesday, April 2, 2013

Get Your 3D Social Icons With Spin 360 degrees

3D Social Icons With the Css rotate when you place your cursor over each icon they spin 360 degrees, they then spin back 360 when the cursor is removed (Cool eh).I also have a slight opacity hover effect on the icons.So in this post I will show you how to add the icons to your blog, linked to your social profiles and feeds.

Add The Social Icons With Css Effects To Your Blog Like This sample:


IconIconIconIconFollow Me on Pinterest

spice up your blog

OK so I have two tutorials, one for Blogger and one for Wordprtess.

Wordpress Tutorial


1) In Your Wordpress Dashboard Click 'Apperance' > 'Widgets' > Add A text Widget to your sidebar and paste in the code

Widget Code
--------------------------------------------------------------------------------------------------------------------------
   <style> #social a:hover {background-color: transparent;opacity:0.7;} #social img { -moz-transition: all 0.8s ease-in-out; -webkit-transition: all 0.8s ease-in-out; -o-transition: all 0.8s ease-in-out; -ms-transition: all 0.8s ease-in-out; transition: all 0.8s ease-in-out; } #social img:hover { -moz-transform: rotate(360deg); -webkit-transform: rotate(360deg); -o-transform: rotate(360deg); -ms-transform: rotate(360deg); transform: rotate(360deg); } </style> <center><div id="social"> <!--Start Rss Icon--> <a title="Grab Our Rss Feed" href="YOUR-FEED-URL-HERE" target="_blank"><img border="0" src="https://blogger.googleusercontent.com/img/b/R29vZ2xl/AVvXsEiiTSOIhGbl5poxLc-5FkrhFTWtEc9ZqEDU9uPUpF2WHcT6U3rLhuhNyzeJGlzY4wxiEfpCh8S_Ot9rsubF7Xrttsf9PU2ev2KuTCUIwKJQ1Qy2ykT-SKwI34S6uRO6aXB6nRrIDc9fbziR/s1600/RSS-48x48.png" style="margin-right:1px;" alt="Icon"/></a> <!--End Rss Icon--> <!--Start Email Rss Icon--> <a rel="nofollow" title="Get Free Updates Via Email" href="YOUR-EMAIL-RSS-URL-HERE" target="_blank"><img border="0" src="https://blogger.googleusercontent.com/img/b/R29vZ2xl/AVvXsEj0Dcn-4uN-Ow6bPyX53a8g5P8LNdatq8MFRaTTPujdyVUr_4-3j2ocDQ20IjLu6qJS5ROLX1C4V6LLRCqIlubiV9aL1K6JQlkuDOvSevgD4w-ZBulX8T4dz1e-ARuZKN9WBE86R6sry_ZW/s1600/RSS-EMAIL-48x48.png" style="margin-right:1px;" alt="Icon"/></a> <!--End Email Rss Icon--> <!--Start Facebook Icon--> <a rel="nofollow" title="Like Our Facebook Page" href="YOUR-FACEBOOK-PAGE-URL-HERE" target="_blank"><img border="0" src="https://blogger.googleusercontent.com/img/b/R29vZ2xl/AVvXsEh62hdjOKdNS9xuS5KCzOGsieixeFMoltP8fjRBhKWphfCRgKZZ1T1Gey8nDRgjx6Hs2-Lyylh9pF6agzqfV0k1rxhsuOJEbwIT0C-Il2SSeQTfr_84YbT4JqgQNA6wJynMaW_b34gXI2s9/s1600/FACEBOOK-48x48.png" style="margin-right:1px;" alt="Icon"/></a> <!--End Facebook Icon--> <!--Start Twitter Icon--> <a rel="nofollow" title="Follow Our Updates On Twitter" href="YOUR-TWITTER-URL-HERE" target="_blank"><img border="0" src="https://blogger.googleusercontent.com/img/b/R29vZ2xl/AVvXsEi6TKBaHcvx-8KYCF3ddSX65kMISoBqOlpVfLz-rKK04p9Bo4MNf_gwUjV2EiwfKHSrJfLRxK6UofoVEdZHUf1k1zVleQcwt0Ah-f9ITlaIKo1CByBB6Vaex6fR3_ByXz3YIFzIZV07eMc8/s1600/TWITTER-48x48.png" style="margin-right:1px;" alt="Icon"/></a> <!--End Twitter Icon--> <!--Start Google+ Icon--> <a title="Follow Us On Google+" rel="nofollow" href="YOUR-GOOGLE-PLUS-URL-HERE" target="_blank"><img style="margin-right:1px;" src="https://blogger.googleusercontent.com/img/b/R29vZ2xl/AVvXsEgx6pJcZAo24I7Azo43W1nocI_c3vuffo6TSMSxsFBP13fJ4-zQnLpvFSSIvHwEy-ChZIn5MFbPR9LYdcvA_60WH0wjNJbZ-AWa23ySe_9_fOe1U36dM5rpSvhoqkIXuPxl0mWBa4vqosOg/s1600/GOOGLE-PLUS-48x48.png"/></a> <!--End Google+ Icon--> <!--Start Pinterest Icon--> <a title="Follow Our Pins" rel="nofollow" href="YOUR-PINTEREST-URL-HERE" target="_blank"><img style="margin-right:1px;" src="https://blogger.googleusercontent.com/img/b/R29vZ2xl/AVvXsEj1xi0QuRG7gJFjsA7UTY5JoBzm900BmM-YTd33XOOsAd9euBgbIjz7Sne59O7FuUpYUj_UaAzfIIN2bH6Dr8dWYlF8aSzvAHoqT8fBpqZHROvAdx0eyAi9wRFbI7sgBJpNzDaJRWei_zyA/s1600/PINTEREST-48x48.png" alt="Follow Me on Pinterest" /></a> <!--End Pinterest Icon--> </div><br/> <!--Start Feed Count Button--> <a href="YOUR-FEEDBURNER-URL-HERE" target="_blank"><img alt="spice up your blog" src="http://feeds.feedburner.com/~fc/spiceupyourblog?bg=ff9933&fg=000000&anim=1" style="border:0" /></a><!--End Feed Count Button--> </center>
------------------------------------------------------------------------------------------------------------------------

Important - Replace the yellow sections with your social profiles and feed URLs.

Note - If your familiar with Wordpress you can off course add the Css to your theme stylesheet.

Remove some of the icons - I have the code for each icon between tags like this <!--Start Rss Icon-->Code here<!--End Rss Icon-->>, to remove an icon remove the code between the tags.So for pinterest you will remove the code between the Start Pinterest and End Pinterest tags etc...

Blogger Tutorial

1) In the new Blogger dashboard click the drop down menu for your blog > Choose 'Layout' > Click 'Add A Gadget' > Choose 'Html Javascript' > Paste In The Following Code as shown in the video :


Widget Code:
------------------------------------------------------------------------------------------------------------------------

    <style> #social a:hover {background-color: transparent;opacity:0.7;} #social img { -moz-transition: all 0.8s ease-in-out; -webkit-transition: all 0.8s ease-in-out; -o-transition: all 0.8s ease-in-out; -ms-transition: all 0.8s ease-in-out; transition: all 0.8s ease-in-out; } #social img:hover { -moz-transform: rotate(360deg); -webkit-transform: rotate(360deg); -o-transform: rotate(360deg); -ms-transform: rotate(360deg); transform: rotate(360deg); } </style> <center><div id="social"> <!--Start Rss Icon--> <a title="Grab Our Rss Feed" href="YOUR-FEED-URL-HERE" target="_blank"><img border="0" src="https://blogger.googleusercontent.com/img/b/R29vZ2xl/AVvXsEiiTSOIhGbl5poxLc-5FkrhFTWtEc9ZqEDU9uPUpF2WHcT6U3rLhuhNyzeJGlzY4wxiEfpCh8S_Ot9rsubF7Xrttsf9PU2ev2KuTCUIwKJQ1Qy2ykT-SKwI34S6uRO6aXB6nRrIDc9fbziR/s1600/RSS-48x48.png" style="margin-right:1px;" alt="Icon"/></a> <!--End Rss Icon--> <!--Start Email Rss Icon--> <a rel="nofollow" title="Get Free Updates Via Email" href="YOUR-EMAIL-RSS-URL-HERE" target="_blank"><img border="0" src="https://blogger.googleusercontent.com/img/b/R29vZ2xl/AVvXsEj0Dcn-4uN-Ow6bPyX53a8g5P8LNdatq8MFRaTTPujdyVUr_4-3j2ocDQ20IjLu6qJS5ROLX1C4V6LLRCqIlubiV9aL1K6JQlkuDOvSevgD4w-ZBulX8T4dz1e-ARuZKN9WBE86R6sry_ZW/s1600/RSS-EMAIL-48x48.png" style="margin-right:1px;" alt="Icon"/></a> <!--End Email Rss Icon--> <!--Start Facebook Icon--> <a rel="nofollow" title="Like Our Facebook Page" href="YOUR-FACEBOOK-PAGE-URL-HERE" target="_blank"><img border="0" src="https://blogger.googleusercontent.com/img/b/R29vZ2xl/AVvXsEh62hdjOKdNS9xuS5KCzOGsieixeFMoltP8fjRBhKWphfCRgKZZ1T1Gey8nDRgjx6Hs2-Lyylh9pF6agzqfV0k1rxhsuOJEbwIT0C-Il2SSeQTfr_84YbT4JqgQNA6wJynMaW_b34gXI2s9/s1600/FACEBOOK-48x48.png" style="margin-right:1px;" alt="Icon"/></a> <!--End Facebook Icon--> <!--Start Twitter Icon--> <a rel="nofollow" title="Follow Our Updates On Twitter" href="YOUR-TWITTER-URL-HERE" target="_blank"><img border="0" src="https://blogger.googleusercontent.com/img/b/R29vZ2xl/AVvXsEi6TKBaHcvx-8KYCF3ddSX65kMISoBqOlpVfLz-rKK04p9Bo4MNf_gwUjV2EiwfKHSrJfLRxK6UofoVEdZHUf1k1zVleQcwt0Ah-f9ITlaIKo1CByBB6Vaex6fR3_ByXz3YIFzIZV07eMc8/s1600/TWITTER-48x48.png" style="margin-right:1px;" alt="Icon"/></a> <!--End Twitter Icon--> <!--Start Google+ Icon--> <a title="Follow Us On Google+" rel="nofollow" href="YOUR-GOOGLE-PLUS-URL-HERE" target="_blank"><img style="margin-right:1px;" src="https://blogger.googleusercontent.com/img/b/R29vZ2xl/AVvXsEgx6pJcZAo24I7Azo43W1nocI_c3vuffo6TSMSxsFBP13fJ4-zQnLpvFSSIvHwEy-ChZIn5MFbPR9LYdcvA_60WH0wjNJbZ-AWa23ySe_9_fOe1U36dM5rpSvhoqkIXuPxl0mWBa4vqosOg/s1600/GOOGLE-PLUS-48x48.png"/></a> <!--End Google+ Icon--> <!--Start Pinterest Icon--> <a title="Follow Our Pins" rel="nofollow" href="YOUR-PINTEREST-URL-HERE" target="_blank"><img style="margin-right:1px;" src="https://blogger.googleusercontent.com/img/b/R29vZ2xl/AVvXsEj1xi0QuRG7gJFjsA7UTY5JoBzm900BmM-YTd33XOOsAd9euBgbIjz7Sne59O7FuUpYUj_UaAzfIIN2bH6Dr8dWYlF8aSzvAHoqT8fBpqZHROvAdx0eyAi9wRFbI7sgBJpNzDaJRWei_zyA/s1600/PINTEREST-48x48.png" alt="Follow Me on Pinterest" /></a> <!--End Pinterest Icon--> </div><br/> <!--Start Feed Count Button--> <a href="YOUR-FEEDBURNER-URL-HERE" target="_blank"><img alt="spice up your blog" src="http://feeds.feedburner.com/~fc/spiceupyourblog?bg=ff9933&fg=000000&anim=1" style="border:0" /></a><!--End Feed Count Button--> </center>

-----------------------------------------------------------------------------------------------------------------------
Important - Replace the yellow sections with your social profiles and feed URLs.

Remove some of the icons - I have the code for each icon between tags like this <!--Start Rss Icon-->Code here<!--End Rss Icon-->>, to remove an icon remove the code between the tags.So for pinterest you will remove the code between the Start Pinterest and End Pinterest tags etc...
Enhanced by Zemanta

Monday, April 1, 2013

How to put photos from Facebook fans on the blog?

In this article, we will see how to put the typical table showing the faces of the people (fans) who follow the blog through Facebook. It is what is called a "Like Box" ...

As you know, people of Facebook has a page specifically dedicated to developers, who can enable social elements into your blog or website. It is highly recommended not to use it even know initially.
We summarize the different elements that can be found:

    Like Button: The button that we put in each blog entry
    Activity Feed. Shows a box wall with activity
    Recommendations. Displays a box with those wall postings with votes
    Like box. It is the example we are doing right now.
    Login Box. It's a login button of facebook account
    Registration. Create your user registry from your own Web (combined then with the Login Box)
    Comments. It's a box to post comments from your website or blog, these are posted on the wall
    Live stream. Ideal for live events and live, allows active participation of users. A kind of chat where you seeing what others are writing. Example broadcast of a sporting event where you have for example the video of a football game on the right have this Live Stream that allows real-time feedback. Penalty!, Penalty!, Lol.

Follow these steps to see a box with photos of fans in your blog or site:

    Open another browser tab your fan page
    Copy the web address (URL) in the navigation bar of the browser itself
    Connect with this page
    Where it says "Facebook Page URL" you must paste the address of your site on Facebook
    Set the various parameters
    Click the Get Code button, copy it (is a iframe)
    Design Go
    Add a Gadget of type HTML / Java Script Menu on the right.
    Paste the code into the Gadget
    Press the Save button and see your blog

Here's my example:

    <Iframe scrolling = "no" frameborder = "0" style = "border: none; overflow: hidden, width: 210px, height: 230px;" allowtransparency = "true"> </ iframe>


You can see it working right in the vertical menu, set the parameters of width (W) and height (h) to adjust and integrate into your site.


Note: Only works with Fan Pages (fanpages) not a personal profile.
Enhanced by Zemanta

Sunday, March 31, 2013

How to display your picture next to your blog in the Google results

photo with blog
 In this tutorial you will learn to set up your blog and your Google+ profile so that your photo is displayed on the results page of Google.

Innovations that Google applies to its search results page should be exploited and more when it comes to increasing the visibility of your results and which will result in increased traffic to your blog.
 What we want is to show pictures of your Google+ profile next to the title and description of your blog in the Google search results page. If you achieve this, your picture might be the trigger for the surfer clicks on your results if you're not at the top of the result.


Some recommendations must meet

    You have created a profile on Google+
    Your profile should contain your photo, logo or not worth a caricature
    Your photo should be a close-up to show your face clearly
    Try to get that picture does not have background elements
    Your photo should be sharp and focused
    A neutral background help you stand out more
    Not many people can appear in the photo
    The picture may not appear trademarks

Note: The truth is I've seen pictures on the results page do not understand why let in unless they conform to the specifications says Google, for example this.
How to display your picture next to your blog in the Google results

Step 1. Set up your blog
Link to your Google+ profile from your blog using parameter Author
If you have a presence in Google+, you probably already have a icon follow me on Google+. If you have no presence, you would have to sign on Google+, create your profile and add your photo.

In either case, the link you put on your blog to your profile should look like this:


    author" target="_blank"> ...


Note the attribute? Rel = author "after Google+ ID, that is where the key is. Should respect these parameters on your link to your Google+ profile

How to know my ID on Google Plus
Very easy, go to Google+, go to the profile icon (on the vertical bar on the left) and look at the URL in the browser you have. In My case is: https://plus.google.com/111757776337593221461, this number is that you have to put in your link.


How to put an icon in my blog follow me on Google+

If you are someone who does not have an icon, you can get one by following this tutorial. The code you already updated there facilitated by parameter Author. If you do not want icon, just copy the code snippet above, fill in your ID, where the ellipsis by name or follow me on Google+ and add it to the side of your blog using the type with Gadget HTML / Java Script. If you have it you just have to update your link with the parameters you Author explained above.


Step 2. Configure your Google+ profile

Now we will complete your profile Google + where we will place a link to your blog for this, follow these steps.

    Google+ Profile Setup with links to the blog
    Access your Google+ profile
    Click on the tab About me
    Click the Edit Profile (located on top)
    Add a link to your blog in sections and links Collaborator
    Enjoy and updated if necessary a photo to your profile

Ready, now have to wait 1-2 weeks. Try to find you through Google and you should see your photo.

How to verify that everything is correct
If you want to check that everything is correct, use this tool where you simply need to enter the URL of your blog and click the Preview button. Must show a simulation of the result where your picture should appear. For more information on this issue, here is the link for the Official Service Centre for the Google Webmaster.
Note: Your photo will appear only once in the results page but it contains more entries on your blog, otherwise it would fill the results page with your picture and look like you work at Google, lol. Another thing, if you have applied these steps in more of your blogs and you're looking through your name, your picture will show the first results. That does not mean you did wrong in your other blog, get it apart and see your photo too.


Enhanced by Zemanta

Saturday, March 30, 2013

The Trick to Add Blogger With Thumbnails

This time an alternative Trick that show a

Blogger with Thumbnails

  quite reliable tool for the template.


How to add Blogger?


First, let'' Design | Edit HTML'', where'' mark'' Expand Widget Templates. Look for the following area:
</ Head>

Above this, will Paste the following code:

<b:if cond='data:blog.pageType == &quot;item&quot;'>
<style type="text/css">
#related-posts {
float:center;
text-transform:none;
height:100%;
min-height:100%;
padding-top:5px;
padding-left:5px;
}

#related-posts h2{
font-size: 1.6em;
font-weight: bold;
color: black;
font-family: Georgia, “Times New Roman”, Times, serif;
margin-bottom: 0.75em;
margin-top: 0em;
padding-top: 0em;
}
#related-posts a{
color:black;
}
#related-posts a:hover{
color:black;
}

#related-posts  a:hover {
background-color:#d4eaf2;
}
</style>
<script type='text/javascript'>
var defaultnoimage="http://2.bp.blogspot.com/-R285B_Pf0q4/TbXKNLTdA8I/AAAAAAAAAzk/9cKeL67QAzc/s1600/sinimagen.jpg";
var maxresults=5;
var splittercolor="#d4eaf2";
var relatedpoststitle="Entradas relacionadas:";
</script>
<script src='https://sites.google.com/a/blogsydescargas.co.cc/ayudabloggers/scripts2/posts-relacionados-blogger.js' type='text/javascript'/>
</b:if>

Now find the following line:

<div class='post-footer-line post-footer-line-1'>

If you can not find it, look this one:

<p class='post-footer-line post-footer-line-1'>


Below this, paste the following code:


 <b:if cond='data:blog.pageType == &quot;item&quot;'>
<div id='related-posts'>
<b:loop values='data:post.labels' var='label'>
<b:if cond='data:label.isLast != &quot;true&quot;'>
</b:if>
<script expr:src='&quot;/feeds/posts/default/-/&quot; + data:label.name + &quot;?alt=json-in-script&amp;callback=related_results_labels_thumbs&amp;max-results=6&quot;' type='text/javascript'/></b:loop>
<script type='text/javascript'>
removeRelatedDuplicates_thumbs();
printRelatedLabels_thumbs(&quot;<data:post.url/>&quot;);
</script>
</div><div style='clear:both'/>
</b:if>


Note:
If you want to change the number of entries that replaces the number displayed in the following area:

max-results=6

  if you want to replace the image that appears when an entry does not contain any, replaces the following URL for the desired:

 http://tricksblogspot.com/-R285B_Pf0q4/TbXKNLTdA8I/AAAAAAAAAzk/9cKeL67QAzc/s1600/sinimagen.jpg


Enhanced by Zemanta

Making a 404 Error Custom Page Not Found Trick

Design 404 Error Page For
English: 404 Error Symbol Deutsch: 404 Fehler ...
English: 404 Error Symbol Deutsch: 404 Fehler Symbol (Photo credit: Wikipedia)
Blogger

The 404 page will prompt visitors that he has landed a page not found and will provide him three important options which are:
  • Go Back to the page from where he came from. We will use JavaScript here.
  • Contact the Admin and inform him about the broken link. This will help you track broken links
  • And finally to provide a link to homepage.
Lets get to work to achieve all the above. Simply follow the easy steps below to display 404 error message uniquely.
  1. Go To draft.blogger.com > Settings > Search Preferences
  2. Click on Edit link next to : Custom Page Not Found
  3. Inside the box paste the following code: 
---------------------------------------------------------------------------------------------------------------
<!-- MBT Default Template -->
<div class='MBT-404-box'>
  <p style='line-height: 30px'><strong>
<font color='#ff0000' size='5'>
Oops!
</font> <font color='#666666'>
Looks like you either clicked a broken link or a Page that no more exits. Kindly do one of the followings:
</font></strong></p>
  <ol style='line-height: 25px'>
    <li><a href='javascript:history.go(-1)'>&#171; Go Back</a> </li>
    <li>Report the Problem to us by <a href='http://contact.tricksblogspot.blogspot.com'>Clicking Here</a>&#160;&#160;&#160; (<em>This will help us serve you even better</em>) </li>
    <li>Go To Homepage by <a href='http://www.tricksblogspot.blogspot.com'>Clicking Here</a>
      <br/></li>
  </ol>
  <p>
    <br/>
    <br/>
    <br/></p>
  <p align='center'><font color='#0080ff' style='font-size: 150px'><strong>404</strong></font></p>
  <p>&#160;</p>
  <p align='center'/>
  <p align='center'><font size='5'>Page Not Found!</font></p>
</div>
         Make these customizations:
  • You can edit the bolded texts with anything you like
  • Replace http://contact.tricksblogspot.blogspot.com with link of your contact page
  • Replace http://www.tricksblogspot.blogspot.com with your homepage link
   4.   Click the Save changes  button and you are half way done.
    5.  Go to Template > Edit HTML
   6.   Search for this ]]></b:skin>
    7.  Just below it paste the following code stylsheet code:
---------------------------------------------------------------------------------------------------
<b:if cond='data:blog.pageType == &quot;error_page&quot;'>
<style type='text/css'>
.status-msg-wrap {
    font-size: 100%;
    margin: none;
    position: static;
    width: 100%;
}
.status-msg-border {
    display:none
}
.status-msg-body {
    padding: none;
    position: static;
    text-align: inherit;
    width: 100%;
    z-index: auto;
}
.status-msg-wrap a {
    padding: none;
    text-decoration: inherit;
}
.MBT-404-box {
  background:#FFFFFF;
  width:98%;
  margin:10px 0px;
  padding:20px 10px;
  border:1px solid #ddd;
  -moz-border-radius:6px;
  -webkit-border-radius:6px;
  border-radius:6px;
  box-shadow: 5px 5px 5px #CCCCCC;
}
</style>
</b:if>
-----------------------------------------------------------------------------------------------------------------
     To change the background color of the box edit #FFFFFF
    8.   Save your template
    9.   Done!

Enhanced by Zemanta

The Trick to Change Image On Blogger

How to make an image clickable?

The complete clickable image code looks like this,
<a href="LANDING URL" target="_blank">Image LINK" width="" height=""  alt=""  title="" border="0" /></a>


  • Where refers to where will the image take the user when it is clicked.
  • Where IMAGE LINK refers to the URL of your picture
  • width="" and height="" has to be given proper values in pixels
  • alt="" is alternative text tag that you right to tell search engine robots what the image is about
  • title="" is the name of the image that appears on mouse hover. It is always kept the same as the alt=""
  • border="0" ensures that no border or outline appears across the image
For example for the image below I have used the following code,
<a href="http://tricksblogspot.blogspot.com/" target="_blank"><img src="IMAGE LINK" width="240px" height="180px"  alt="Clickable Horse image" title="Clickable Horse image" border="0" /></a>


When you click the image, it will take you to our homepage. Else if you want to link to the original size of image then use this code,


<a href="IMAGE LINK" target="_blank"><img src="IMAGE LINK" width="240px" height="180px"  alt="Clickable Horse image" title="Clickable Horse image" border="0" /></a>
Clicking the image below will show you its original size.
world globe


How to make the same image un-clickable?

To make any image un-clickable simply remove the href linking tag. After removing the landing address tag we get,
<img src="IMAGE LINK" width="" height=""  alt=""  title="" border="0" />
You will see that the image is no more clickable. and the code I used this time is the same one but without the href tag,
<img src="IMAGE LINK" width="240px" height="180px"  alt="unclickable Horse image" title="unclickable Horse image" border="0" />


unclickable Koala image


How to make an image fade in and fade out?

For this you will need to add a tiny CSS3 code to your template. So kindly follow these steps,
  1. Go To Blogger> Design > Edit HTML
  2. Backup your template
  3. Search for ]]></b:skin>
  4. Add the code below just above it


/*---MBT FADE OUT CODE ----*/
.Fadeout img {
filter:alpha(opacity=100);
opacity: 0.3;
border:0;
}
.Fadeout:hover img {
filter:alpha(opacity=30);
opacity:1.0;
border:0;
}
/*---MBT FADE IN CODE ----*/
.Fadein img {
filter:alpha(opacity=30);
opacity: 1.0;
border:0;
}
.Fadein:hover img {
filter:alpha(opacity=100);
opacity:0.3;
border:0;
}


    5.  Save your template.


Now whenever you wish to add the fading effect to your image then simply insert an additional code to the same Clickable image code that we discussed above.
To make the image Fade out simply insert class="Fadeout" to your image code like this,
<a class="Fadeout" href="LANDING URL" target="_blank"><img src="IMAGE LINK" width="" height=""  alt=""  title="" border="0" /></a>

See an example below. (Hover your mouse cursor on it)


To make the image Fade in simply insert class="Fadein" to your image code like this,
<a class="Fadein" href="LANDING URL" target="_blank"><img src="IMAGE LINK" width="" height=""  alt=""  title="" border="0" /></a>

See an example,


I hope you find it useful. If you wanted to know where to save your images or to get IMAGE Links then read this post,
Enhanced by Zemanta

Submiting Your Blog From Blogger To Bing and Yahoo

Image representing Bing as depicted in CrunchBase
Image via CrunchBase

How to Submit your blog to BING .

Just Follow these easy steps:
  1. Log into Bing Webmaster Tools using your hotmail account
  2.  Click the button " Add Site"  next to "Remove site button".
  3. add site to bing


    3.   Submit your URL.
submit blog to bing
       4.   Click Submit. Now you will be asked to verify if you are the true owner of the website or blog you submitted. You will be provided three standard methods. Choose the second option which is "Copy and paste a tag in your default webpage"  Click option:2
verify ownership
         5.  You will be given a short HTML code. Simply copy it and paste the code just below <head> inside your blogger template. To do this go to:
  • Blogger > Design > Edit HTML > Backup your template
  • Look for <head>
  •  Paste the code you got from BING
  • Save your template. YOU REDY!
        6. Go back to BING webmaster page and click the "Verify" Button. If you pasted the code correctly then your sitemap will be successfully added to the list.
         7.  Ii should take at most 3 days for BING and YAHOO to start showing data for your newly submitted site but it can even take 5 days. So be patient and expect your blog links appearing in BING and YAHOO search engines within 3-5 days.

Then be able to track organic traffic to your blogs via your webmaster account which is almost similar to Google Webmaster tools account.

Ping Yahoo and Bing

Sometimes you want to inform about a quick update at your blog to Bing and Yahoo, so that they may send crawlers to index your newly added content before time. Don't ping search engines too frequently for it can be taken as overloading the servers which can even get you penalized from search listings. Do it only when you feel that your links are not appearing at Yahoo and Bing page.
Just after blog submission you may also ping the search engines to draw more attention. 

Steps:
  1. From the links below , replace www.tricksblogspot.com with your blogspot links or custom domain links. (Example: zailab.blogspot.com  or www.zailab.com)
  2. Paste the following links in your browser address bar one at a time and hit enter. You will see a message "Thanks for submitting your sitemap." indicating that you have successfully pinged Bing.
For Bing:
LINK#1 For Posts between 1-500
http://www.bing.com/webmaster/ping.aspx?siteMap=http%3A%2F%2Fwww.tricksblogspot.com%2Fatom.xml%3Fredirect%3Dfalse%26start-index%3D1%26max-results%3D500

LINK#2 For Posts between 5001-1000
http://www.bing.com/webmaster/ping.aspx?siteMap=http%3A%2F%2Fwww.tricksblogspot.com%2Fatom.xml%3Fredirect%3Dfalse%26start-index%3D501%26max-results%3D500
LINK#3 For Posts between 1001-1500
http://www.bing.com/webmaster/ping.aspx?siteMap=http%3A%2F%2Fwww.tricksblogspot.com%2Fatom.xml%3Fredirect%3Dfalse%26start-index%3D1001%26max-results%3D500

If you thinking what about YAHOO dont worry:
You don't need to do this. Pinging bing will do the job

Test to see if your links are appearing

Simply paste your latest post URL inside Bing and Yahoo and see if your blog is appearing in the search results. If it did then say great and enjoy but if it did not then there could be two reasons:
  1. You need to wait for at most 5 days after first submission of your Blog
  2. You blog has no sufficient posts. Your blog must contain at least 15 posts
YAHOO!
yahoo search results


Tips: If despite waiting for 5 days, your links are still not showing up at Yahoo and Bing then do this:
  1. PING them again and wait for a day. If things did not work then try step#2 below
  2. Remove your Site from BING webmaster tools and resubmit it.
  3. PING them just after blog submission.
Enhanced by Zemanta

Botones Isometricos de Social Media


Barra Lateral Fija