Welcome Enjoy Tutorials

Liked us?

Showing posts with label Search Engines. Show all posts

Tuesday, May 7, 2013

Creating a business page on Google+ and get badge for blog

At the beginning of the month of November 2011, Google opened the possibility that companies and brands to create your Google+ page. Until then, only allowed discharge of personal profiles. If you have a business, brand, company, or other musical group, it's time to have your own page on Google+.


Some time ago I wrote an article called "A company has no friends, has fans" and tried not to fall into the mistake of creating a personal profile to manage our brand presence on Facebook.

Now with Google+, and although it is mandatory to have a personal profile to create and manage a brand page (not in Facebook), which subsequently we empower our followers, customers, etc.. page is not marked as such profile that aims administration.

You should see the following video where you can see how a user added to his circles to a company that sells and repairs bicycles ZEN Bikes. The company uses Google+ page to announce not only their news but also as a meeting place with your customers with pictures of activities, hangouts (video conference), suggestion box, etc..


The strategy that Google poses to our business, is based on three pillars. The first is sharing, there is no doubt that this new space represents all a platform to share photos, videos, milestones and all we want to communicate the business. The second is to let you know by logos (logos) to be recognized by your followers and customers and aims to take you to your Google+ page. Finally measure ... and it's not easy to know the impact on our fans and customers, so Google is planning to offer in the future statistics on the use of your Google+ page


Steps to create your Google+ brand page and put a logo on blog


Step 1. Create a Page on Google+

     Sign in to Google+ for businesses and click on Create a page on Google+
     You must have already previously created a personal profile, otherwise you will give you high.
     Once inside you will see a screen like the one show below:

google plusSelect the button to the left (categories) that best defines your company brand. Depending on what you choose will ask certain data. Click the Create button to register your site
    In the next step will ask you to personalize the page with your company logo and a slogan.


Step 2. Get your insigna

    When your page is created, you will see a welcome page
    Click Get Badge (recommended) or accessed through this link you prefer on this link and then put the ID of your page if it appears empty. More info here
    Choose the type of logo that you like, I chose the large icon
    Copy the code to put on the blog now


Step 3. Add your insginia in Blog (Blogger)

    Open the tab "Design"
    In the sidebar select "Add New Gadget".
    A list, choose the one that says "HTML / Javascript".
    In content, paste the code obtained above.
    Save the template and view the blog.
    Remember that you can move the gadget to place it in the desired location.

How do I manage the new page on Google+?

When you enter your personal profile on Google+, you will see a dropdown to the left under your name from which you manage your pages.

How do I publish blog content on the new page on Google+?
So far I know of no service that links the publication of new blog posts to your Google+ page. So you should copy the url of the post that you happen to Google+ and paste it in the text box on your page News Google+

Post. In my case I have a personal profile and now a brand page, so far I have not seen a mechanism to migrate profile followers of the page.

We invite you to visit my Google+ page by clicking here or on the badge for you right.

As always, I invite you to use comments to leave your opinion on this article. If you liked this post and want to be anywhere else, follow me via Facebook, Twitter, subscribe by email, Google Friend, RSS now also on Google +. Use social buttons at the bottom of the post to recommend it to your friends. Thank you!
Enhanced by Zemanta

Wednesday, May 1, 2013

Create A Contact Form For Blogger

In our blog we've created multiple entries, so we connected with Google Analytics and have sent the Sitemap with WebMaster Tools. Now we will add a new element extremely important, a contact form ...
To achieve this new goal we will use another Google service, called Google Docs. This service allows you to create and share through Internet text documents, spreadsheets, slide presentations, drawings and forms.

The form designer Google Docs so we will create a number of fields such as name, email, comments and finally provides the HTML code, integrate into a new blog page.

Create and insert a contact form on the blog

Step 1. Connect to Google Docs
Step 2. If the user interface is in English you follow these steps:

    Click top right where the settings icon
    Click the Settings Documents menu
    Sets the Spanish language and time zone. Click save.


Step 3. Use the button "create new" and indicates that it is a form
Step 4. Design your form with standard fields, you can dial even mandatory.
Step 5. Each field you think you can assign a type (text, paragraph, list, checkbox, etc.)
Step 6. Top right, you have a button "More Actions", select "Insert"
Step 7. Copy the code, return to blogger
Step 8. Create a new page (not post) with the title "Contact"
Step 9. In the "Edit HTML" editing paste the code copied from the form
Step 10. Save the page and verify that it works

Notes: If you have a page navigation menu, the new page will automatically be added as it is at this blog. If not, write to link to the new page and put the link in a prominent blog.

You can further improve the design of the form (new fields, template ...) and this is automatically updated in our blog page.

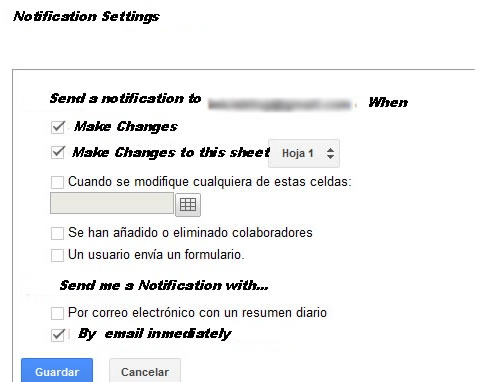
Enabling email notifications
For every form submitted, the system creates a new record in a spreadsheet automatically. Follow these steps to configure the notification system and alert you by email that you have a new contact.

    Go back to Google Docs and click on the Excel sheet associated with the form contact
    Go to the Tools menu and click Notification Rules ...
    Mark the options as shown in the following graph:
notificaton form

Once configured the notifications just have to run a test yourself ... filled the form.


If you had any questions or problems leave comment in this same e
Enhanced by Zemanta

Tuesday, April 30, 2013

Google Analytics For Statistics Blog

Google Analytics is a free service of Google analytics specialist websites using automatic data collection from visitors. Will be able to inform us about the number of visits, average time of the same, the pages viewed, unique visitors, visitor loyalty, location of users and so on.

What is the purpose of this tutorial?
If you've never used Google Analytics, the goal is to register an account and then ownership of your website / Blog. If you wore it before, you just need to add a new property. In both cases, we have to integrate a tracking code on the blog, which will collect all the information necessary to produce the statistics.

Do I really need if I just start the blog?

It is highly recommended, it is a necessity, even if your blog takes only a few days and visits published is not what you care about is more important for the future leave this task done from the beginning. Of course if your blog takes more time is urgent and you have the necessary configuration.
Tutorial. Steps to register your blog on Google Analytics
Step 1 and 2 of the tutorial is conditional on whether or not you were already user of Google Analytics.
1. Case 1. I am new, I never used Google Analytics
google analysis dashboard

    Access to Google Analytics
    Then it will show a wizard.
The first step is to register your account see image in step 1. After filling the data, press the Create Account button and continue at step 3 of this tutorial.

Two. Case 2. I already had an account set up in Google Analytics

    Access to Google Analytics
    Upon entering, select your account
    Click add new property. See display this step. Click the Create button property to subsequently obtain the tracking code.

Three. Get the tracking code (common for both cases)

    On the tracking code. Copy the code by right-clicking or Ctrl C provided on this page and go to siquiente step.

April. Paste the tracking code on the Blog

    Access Blogger
    Click Template tab
    Make a backup by clicking the "Create Backup / Restore"
    Click the Edit HTML button
    Click the Continue button
    Press the key combination Ctrl F or Ctrl B (Mac ⌘ ⌘ F or B) and looking
    Tracking code paste previously obtained just above the line found
    Save, view your blog, you should not be anything unusual

Once these steps, wait 24 hours and returns to access Google Analytics in order to verify that you are data on visits to your blog.

Enhanced by Zemanta

Sunday, March 31, 2013

Google Analytics to learn Statistics Blog

Google Analytics Hacks
Google Analytics Hacks (Photo credit: Search Engine People Blog)
Google Analytics is a free Google service specializing in web site analytics by automatically collecting data from visitors. It will be able to tell us about the number of visits, average time of the same, page views, unique users, user loyalty, location of users and so on.

What is the purpose of this tutorial?
If you've never used Google Analytics, the goal is to register an account and then ownership of your website / blog. If you wore it before, you just have to add a new property. In both cases, we have to integrate a tracking code in the blog, which will collect all the necessary information to compile statistics.

Is it really necessary if I just start the blog?
It is highly recommended, is a must, but bring your blog published a few days and visits is not the most important concern is you in the future leave this task done from the beginning. Of course if your blog takes more time is urgent and you have available for this configuration.

Tutorial. Steps to register your blog with Google Analytics
Step 1 and 2 of the tutorial is conditional on whether or not you were already user of Google Analytics.
1. Case 1. I'm new, I never used Google Analytics

    Log in to Google Analytics
    Then it will show a wizard. The first step is to register your account picture in step 1. After filling the data, press the Up button and proceed to Step 3 of this tutorial.

2. Case 2. I already had an account set up in Google Analytics

    Log in to Google Analytics
    Upon entering, select your account
    Click add new property. See this step screen. Click the Create button property to subsequently obtain the tracking code.

3. Get the tracking code (common to both cases)

    The display of the tracking code. Copy the code by right-clicking or Ctrl C provided on this page and go to step siquiente.

4. Paste the tracking code on the Blog

    Login to Blogger
    Click Template tab
    Make a backup by clicking the "Create Backup / Restore"
    Click the Edit HTML button
    Click the Continue button
    Press the key combination Ctrl F or Ctrl B (Mac ⌘ ⌘ F or B) and find
    Paste tracking code previously obtained just above the line found
    Save, view your blog should not see anything unusual

Once these steps, wait 24 hours and returns to access Google Analytics in order to verify that the data are already visiting your blog.
Enhanced by Zemanta

How long it takes Google to index a new post in Blogger

Matt Cutts - SMX Advanced 2012 Photos
Matt Cutts - SMX Advanced 2012 Photos (Photo credit: planetc1)
All we have ever asked this question, especially during the first few weeks as bloggers. Anyway, it's frustrating publish, find your blog through for example the title of one of your latest posts and check that there is no trace of your work. This is possibly one of the first reasons why many blogs are abandoned.

The first thing that comes to mind is to think that Blogger does not work even knowing that this is a Google service. The second is to think that our content may not interest anyone and so no trace and well, tried a second and even a third post and nothing at all, we delete the blog and start again as doubt and tend certainly think that we have done wrong, until finally we take it for our blog impossible and goes to swell the list of thousands and thousands of blogs that have become failed attempts.

To solve this puzzle we "invited" Matts Cutts (Google principal engineer) to really explain to us how the search, so we understand the advice you give in the end. When you give the Play, turns on closed down the CC.

Analyzing How Index Works With Matts Cutts


As we have seen, the indexing of content is done through programs called spiders or spider. This allows tracking mechanism be adding to the Google index billions web pages, so that the search is performed on the index, so we hear the phrase ... "is that your site is not indexed by Google" , which is said as an expert and us we curramos the blog we have a face frame and thought ... that she think this.What Matts Cutts not clear in this video and try to make us, the time elapsed since we published our blog content, until we visit the famous spider to index the contents, so that then we ourselves search our blog by the content of an entry.
Steps for proper indexing

    
Go to the Settings tab in Basic and then check in the Privacy section you answered yes to both questions Want to add your blog to our listings? Allow search engines to find your blog?


Instead wait for the spider to come after us, take the initiative and informed directly of our blog Google sitemap sending.
    
As we saw in the video sites with more "reputation" that is, those with more inbound links and generate more dynamic content are a good place to index. An example of these sites are blog directories. These are indexed by Google much faster is a good choice as ultimately are links that lead to your blog.
    
Keep posting, at least 1 or 2 week post thus how often Google crawls your blog will be much higher and therefore the time elapsed since the public until your post goes to the index will be much lower.
    
Be patient, especially at the beginning as it can take up to one week to 10 days until they finally find our blog looking for content.
    
The key now is to continue publishing and applying different SEO Blogger tips that will help you position yourself better in search results (so far we have only spoken of content indexing)


Enhanced by Zemanta

Botones Isometricos de Social Media


Barra Lateral Fija