Welcome Enjoy Tutorials

Liked us?

Showing posts with label HTML. Show all posts

Friday, June 7, 2013

Nube Color Negro Para Etiquetas De Blogger


En este articulo te explicare cómo añadir un atractivo widget de etiquetas negra en forma de nube a blogger. Este widget de etiquetas es limpio y bonito, los visitantes pueden encontrar todas las categorías de tu blog fácilmente. Anade estilo y presencia a tu sitio.

Pasos para insertar este widget de etiquetas negras a tu blog.
 1. Entrar a la cuenta de blogger y Click desplegable.

2. A continuación, seleccione "Plantilla", como a continuación.


3. Ahora se puede ver en vivo en el blog, haga clic en el botón Editar HTML "

4. Ahora haga clic en el botón Continuar.
  
5. Encuentre esta etiqueta ]]> </ b: skin>  usando Ctrl + F 

6. Pegue el siguiente código antes de etiqueta ]]> </ b: skin>

/*-----Custom Labels widget by tricksblogspot.blogspot.com/----*/

#Label1 a{float:left;
height:18px;
line-height:18px;
position:relative;
font-size:12px;
margin-bottom: 9px;
margin-left:10px;
padding:5px;
background: rgb(69,72,77); /* Old browsers */
background: -moz-linear-gradient(top,  rgba(69,72,77,1) 0%, rgba(0,0,0,1) 100%); /* FF3.6+ */
background: -webkit-gradient(linear, left top, left bottom, color-stop(0%,rgba(69,72,77,1)), color-stop(100%,rgba(0,0,0,1))); /* Chrome,Safari4+ */
background: -webkit-linear-gradient(top,  rgba(69,72,77,1) 0%,rgba(0,0,0,1) 100%); /* Chrome10+,Safari5.1+ */
background: -o-linear-gradient(top,  rgba(69,72,77,1) 0%,rgba(0,0,0,1) 100%); /* Opera 11.10+ */
background: -ms-linear-gradient(top,  rgba(69,72,77,1) 0%,rgba(0,0,0,1) 100%); /* IE10+ */
background: linear-gradient(to bottom,  rgba(69,72,77,1) 0%,rgba(0,0,0,1) 100%); /* W3C */
filter: progid:DXImageTransform.Microsoft.gradient( startColorstr='#45484d', endColorstr='#000000',GradientType=0 ); /* IE6-9 */
color:#fff;
text-decoration:none;
-moz-border-radius:4px;
-webkit-border-radius:4px;
border-radius:4px;}
#Label1 a:hover{fbackground: rgb(73,192,240); /* Old browsers */
background: -moz-linear-gradient(top,  rgba(73,192,240,1) 0%, rgba(44,175,227,1) 100%); /* FF3.6+ */
background: -webkit-gradient(linear, left top, left bottom, color-stop(0%,rgba(73,192,240,1)), color-stop(100%,rgba(44,175,227,1))); /* Chrome,Safari4+ */
background: -webkit-linear-gradient(top,  rgba(73,192,240,1) 0%,rgba(44,175,227,1) 100%); /* Chrome10+,Safari5.1+ */
background: -o-linear-gradient(top,  rgba(73,192,240,1) 0%,rgba(44,175,227,1) 100%); /* Opera 11.10+ */
background: -ms-linear-gradient(top,  rgba(73,192,240,1) 0%,rgba(44,175,227,1) 100%); /* IE10+ */
background: linear-gradient(to bottom,  rgba(73,192,240,1) 0%,rgba(44,175,227,1) 100%); /* W3C */
filter: progid:DXImageTransform.Microsoft.gradient( startColorstr='#49c0f0', endColorstr='#2cafe3',GradientType=0 ); /* IE6-9 */}
.label-size{line-height:1.5;align:left;}
.h2head-text {margin:-40px 10px 8px 55px;color:#666666;font-family:arial;font-size:13px;}

#Label1{width:320px;;border-bottom-width: 1px;
border-bottom-style: solid;  
border-bottom-color: #D8D8D8;}

7. Ahora Haga clic en Guardar plantilla.

    Listo
Enhanced by Zemanta

Thursday, May 30, 2013

Change the Navigation links for the Title Post On Blogger

The navigation links are listed at the end of the entrance and say: Check latest Post, Post Older, although very useful, would be more useful instead of appearing these links appear the title of the post, this will undoubtedly attract more visitors.

This is just what I'm going to teach today, as changing these links and put in place the title of the Post.


Before:


 After:


To add this trick to your blog, go to Template, Edit HTML and paste before </ head> the following:


<script src="//ajax.googleapis.com/ajax/libs/jquery/2.0.0/jquery.min.js"></script>


Now go to Design, Add Gadget, and HTML / JavaScript paste the following:


 <script type="text/javascript">
$(document).ready(function(){
var newerLink = $("a.blog-pager-newer-link").attr("href");
$("a.blog-pager-newer-link").load(newerLink+" .post-title:first", function() {
var newerLinkTitle = $("a.blog-pager-newer-link:first").text();
$("a.blog-pager-newer-link").text("<< " + newerLinkTitle);
});
var olderLink = $("a.blog-pager-older-link").attr("href");
$("a.blog-pager-older-link").load(olderLink+" .post-title:first", function() {
var olderLinkTitle = $("a.blog-pager-older-link").text();
$("a.blog-pager-older-link").text(olderLinkTitle + " >>");//rgt
});
});
</script><style type="text/css">
#blog-pager{font-family: Arial,helvetica,sans-serif;font-size: 14px;}#blog-pager-newer-link {font-size:85%;width:200px;text-align:left;}#blog-pager-older-link {font-size:85%;width:200px;text-align:right;}</style>


With this last step ended the trick, and you've added this great trick to your blog
Enhanced by Zemanta

The Trick Of Snowflakes falling on the blog


Many bloggers want to get their blogs according to the style of the time, so that is why today I wanted to share a trick with the snow fall will you do on your blog.

This trick is very light so do not overburden your blog, the trick you can see it running in the next blog.

To add this trick to your blog, so you just paste into a HTML Element / JavaScript the following code:
<script type="text/javascript">
//<![CDATA[
// Nieve en el blog
/** @license
DHTML Snowstorm! JavaScript-based Snow for web pages
--------------------------------------------------------
Version 1.42.20111120 (Previous rev: 1.41.20101113)
Copyright (c) 2007, Scott Schiller. All rights reserved.
Code provided under the BSD License:
http://schillmania.com/projects/snowstorm/license.txt
*/
var snowStorm=function(e,d){function g(a,d){isNaN(d)&&(d=0);return Math.random()*a+d}function o(){e.setTimeout(function(){a.start(true)},20);a.events.remove(i?d:e,"mousemove",o)}function r(){if(!a.excludeMobile||!s)a.freezeOnBlur?a.events.add(i?d:e,"mousemove",o):o();a.events.remove(e,"load",r)}this.flakesMax=128;this.flakesMaxActive=64;this.animationInterval=40;this.excludeMobile=true;this.flakeBottom=null;this.followMouse=true;this.snowColor="#ffffff";this.snowCharacter="&bull;";this.snowStick=true;
this.targetElement=null;this.useMeltEffect=true;this.usePositionFixed=this.useTwinkleEffect=false;this.freezeOnBlur=true;this.flakeRightOffset=this.flakeLeftOffset=0;this.flakeHeight=this.flakeWidth=8;this.vMaxX=5;this.vMaxY=4;this.zIndex=0;var a=this,y=this,i=navigator.userAgent.match(/msie/i),z=navigator.userAgent.match(/msie 6/i),A=navigator.appVersion.match(/windows 98/i),s=navigator.userAgent.match(/mobile/i),B=i&&d.compatMode==="BackCompat",t=s||B||z,h=null,k=null,j=null,m=null,u=null,v=null,
p=1,n=false,q;a:{try{d.createElement("div").style.opacity="0.5"}catch(C){q=false;break a}q=true}var w=false,x=d.createDocumentFragment();this.timers=[];this.flakes=[];this.active=this.disabled=false;this.meltFrameCount=20;this.meltFrames=[];this.events=function(){function a(b){var b=f.call(b),c=b.length;l?(b[1]="on"+b[1],c>3&&b.pop()):c===3&&b.push(false);return b}function d(a,c){var e=a.shift(),f=[b[c]];if(l)e[f](a[0],a[1]);else e[f].apply(e,a)}var l=!e.addEventListener&&e.attachEvent,f=Array.prototype.slice,
b={add:l?"attachEvent":"addEventListener",remove:l?"detachEvent":"removeEventListener"};return{add:function(){d(a(arguments),"add")},remove:function(){d(a(arguments),"remove")}}}();this.randomizeWind=function(){var c;c=g(a.vMaxX,0.2);u=parseInt(g(2),10)===1?c*-1:c;v=g(a.vMaxY,0.2);if(this.flakes)for(c=0;c<this.flakes.length;c++)this.flakes[c].active&&this.flakes[c].setVelocities()};this.scrollHandler=function(){var c;m=a.flakeBottom?0:parseInt(e.scrollY||d.documentElement.scrollTop||d.body.scrollTop,
10);isNaN(m)&&(m=0);if(!n&&!a.flakeBottom&&a.flakes)for(c=a.flakes.length;c--;)a.flakes[c].active===0&&a.flakes[c].stick()};this.resizeHandler=function(){e.innerWidth||e.innerHeight?(h=e.innerWidth-(!i?16:16)-a.flakeRightOffset,j=a.flakeBottom?a.flakeBottom:e.innerHeight):(h=(d.documentElement.clientWidth||d.body.clientWidth||d.body.scrollWidth)-(!i?8:0)-a.flakeRightOffset,j=a.flakeBottom?a.flakeBottom:d.documentElement.clientHeight||d.body.clientHeight||d.body.scrollHeight);k=parseInt(h/2,10)};this.resizeHandlerAlt=
function(){h=a.targetElement.offsetLeft+a.targetElement.offsetWidth-a.flakeRightOffset;j=a.flakeBottom?a.flakeBottom:a.targetElement.offsetTop+a.targetElement.offsetHeight;k=parseInt(h/2,10)};this.freeze=function(){var c;if(a.disabled)return false;else a.disabled=1;for(c=a.timers.length;c--;)clearInterval(a.timers[c])};this.resume=function(){if(a.disabled)a.disabled=0;else return false;a.timerInit()};this.toggleSnow=function(){a.flakes.length?(a.active=!a.active,a.active?(a.show(),a.resume()):(a.stop(),
a.freeze())):a.start()};this.stop=function(){var c;this.freeze();for(c=this.flakes.length;c--;)this.flakes[c].o.style.display="none";a.events.remove(e,"scroll",a.scrollHandler);a.events.remove(e,"resize",a.resizeHandler);a.freezeOnBlur&&(i?(a.events.remove(d,"focusout",a.freeze),a.events.remove(d,"focusin",a.resume)):(a.events.remove(e,"blur",a.freeze),a.events.remove(e,"focus",a.resume)))};this.show=function(){var a;for(a=this.flakes.length;a--;)this.flakes[a].o.style.display="block"};this.SnowFlake=
function(a,e,l,f){var b=this;this.type=e;this.x=l||parseInt(g(h-20),10);this.y=!isNaN(f)?f:-g(j)-12;this.vY=this.vX=null;this.vAmpTypes=[1,1.2,1.4,1.6,1.8];this.vAmp=this.vAmpTypes[this.type];this.melting=false;this.meltFrameCount=a.meltFrameCount;this.meltFrames=a.meltFrames;this.twinkleFrame=this.meltFrame=0;this.active=1;this.fontSize=10+this.type/5*10;this.o=d.createElement("div");this.o.innerHTML=a.snowCharacter;this.o.style.color=a.snowColor;this.o.style.position=n?"fixed":"absolute";this.o.style.width=
a.flakeWidth+"px";this.o.style.height=a.flakeHeight+"px";this.o.style.fontFamily="arial,verdana";this.o.style.overflow="hidden";this.o.style.fontWeight="normal";this.o.style.zIndex=a.zIndex;x.appendChild(this.o);this.refresh=function(){if(isNaN(b.x)||isNaN(b.y))return false;b.o.style.left=b.x+"px";b.o.style.top=b.y+"px"};this.stick=function(){t||a.targetElement!==d.documentElement&&a.targetElement!==d.body?b.o.style.top=j+m-a.flakeHeight+"px":a.flakeBottom?b.o.style.top=a.flakeBottom+"px":(b.o.style.display=
"none",b.o.style.top="auto",b.o.style.bottom="0px",b.o.style.position="fixed",b.o.style.display="block")};this.vCheck=function(){if(b.vX>=0&&b.vX<0.2)b.vX=0.2;else if(b.vX<0&&b.vX>-0.2)b.vX=-0.2;if(b.vY>=0&&b.vY<0.2)b.vY=0.2};this.move=function(){var d=b.vX*p;b.x+=d;b.y+=b.vY*b.vAmp;if(b.x>=h||h-b.x<a.flakeWidth)b.x=0;else if(d<0&&b.x-a.flakeLeftOffset<-a.flakeWidth)b.x=h-a.flakeWidth-1;b.refresh();if(j+m-b.y<a.flakeHeight)b.active=0,a.snowStick?b.stick():b.recycle();else{if(a.useMeltEffect&&b.active&&
b.type<3&&!b.melting&&Math.random()>0.998)b.melting=true,b.melt();if(a.useTwinkleEffect)if(b.twinkleFrame)b.twinkleFrame--,b.o.style.visibility=b.twinkleFrame&&b.twinkleFrame%2===0?"hidden":"visible";else if(Math.random()>0.9)b.twinkleFrame=parseInt(Math.random()*20,10)}};this.animate=function(){b.move()};this.setVelocities=function(){b.vX=u+g(a.vMaxX*0.12,0.1);b.vY=v+g(a.vMaxY*0.12,0.1)};this.setOpacity=function(a,b){if(!q)return false;a.style.opacity=b};this.melt=function(){!a.useMeltEffect||!b.melting?
b.recycle():b.meltFrame<b.meltFrameCount?(b.meltFrame++,b.setOpacity(b.o,b.meltFrames[b.meltFrame]),b.o.style.fontSize=b.fontSize-b.fontSize*(b.meltFrame/b.meltFrameCount)+"px",b.o.style.lineHeight=a.flakeHeight+2+a.flakeHeight*0.75*(b.meltFrame/b.meltFrameCount)+"px"):b.recycle()};this.recycle=function(){b.o.style.display="none";b.o.style.position=n?"fixed":"absolute";b.o.style.bottom="auto";b.setVelocities();b.vCheck();b.meltFrame=0;b.melting=false;b.setOpacity(b.o,1);b.o.style.padding="0px";b.o.style.margin=
"0px";b.o.style.fontSize=b.fontSize+"px";b.o.style.lineHeight=a.flakeHeight+2+"px";b.o.style.textAlign="center";b.o.style.verticalAlign="baseline";b.x=parseInt(g(h-a.flakeWidth-20),10);b.y=parseInt(g(j)*-1,10)-a.flakeHeight;b.refresh();b.o.style.display="block";b.active=1};this.recycle();this.refresh()};this.snow=function(){for(var c=0,d=0,e=0,f=null,f=a.flakes.length;f--;)a.flakes[f].active===1?(a.flakes[f].move(),c++):a.flakes[f].active===0?d++:e++,a.flakes[f].melting&&a.flakes[f].melt();if(c<a.flakesMaxActive&&
(f=a.flakes[parseInt(g(a.flakes.length),10)],f.active===0))f.melting=true};this.mouseMove=function(c){if(!a.followMouse)return true;c=parseInt(c.clientX,10);c<k?p=-2+c/k*2:(c-=k,p=c/k*2)};this.createSnow=function(c,d){var e;for(e=0;e<c;e++)if(a.flakes[a.flakes.length]=new a.SnowFlake(a,parseInt(g(6),10)),d||e>a.flakesMaxActive)a.flakes[a.flakes.length-1].active=-1;y.targetElement.appendChild(x)};this.timerInit=function(){a.timers=!A?[setInterval(a.snow,a.animationInterval)]:[setInterval(a.snow,a.animationInterval*
3),setInterval(a.snow,a.animationInterval)]};this.init=function(){var c;for(c=0;c<a.meltFrameCount;c++)a.meltFrames.push(1-c/a.meltFrameCount);a.randomizeWind();a.createSnow(a.flakesMax);a.events.add(e,"resize",a.resizeHandler);a.events.add(e,"scroll",a.scrollHandler);a.freezeOnBlur&&(i?(a.events.add(d,"focusout",a.freeze),a.events.add(d,"focusin",a.resume)):(a.events.add(e,"blur",a.freeze),a.events.add(e,"focus",a.resume)));a.resizeHandler();a.scrollHandler();a.followMouse&&a.events.add(i?d:e,"mousemove",
a.mouseMove);a.animationInterval=Math.max(20,a.animationInterval);a.timerInit()};this.start=function(c){if(w){if(c)return true}else w=true;if(typeof a.targetElement==="string"&&(c=a.targetElement,a.targetElement=d.getElementById(c),!a.targetElement))throw Error('Snowstorm: Unable to get targetElement "'+c+'"');if(!a.targetElement)a.targetElement=!i?d.documentElement?d.documentElement:d.body:d.body;if(a.targetElement!==d.documentElement&&a.targetElement!==d.body)a.resizeHandler=a.resizeHandlerAlt;
a.resizeHandler();a.usePositionFixed=a.usePositionFixed&&!t;n=a.usePositionFixed;if(h&&j&&!a.disabled)a.init(),a.active=true};a.events.add(e,"load",r,false);return this}(window,document);
//]]>
</script>


Now just have to save the changes and you will finish this. The trick will look much better in a dark blog
Enhanced by Zemanta

Wednesday, May 1, 2013

Create A Contact Form For Blogger

In our blog we've created multiple entries, so we connected with Google Analytics and have sent the Sitemap with WebMaster Tools. Now we will add a new element extremely important, a contact form ...
To achieve this new goal we will use another Google service, called Google Docs. This service allows you to create and share through Internet text documents, spreadsheets, slide presentations, drawings and forms.

The form designer Google Docs so we will create a number of fields such as name, email, comments and finally provides the HTML code, integrate into a new blog page.

Create and insert a contact form on the blog

Step 1. Connect to Google Docs
Step 2. If the user interface is in English you follow these steps:

    Click top right where the settings icon
    Click the Settings Documents menu
    Sets the Spanish language and time zone. Click save.


Step 3. Use the button "create new" and indicates that it is a form
Step 4. Design your form with standard fields, you can dial even mandatory.
Step 5. Each field you think you can assign a type (text, paragraph, list, checkbox, etc.)
Step 6. Top right, you have a button "More Actions", select "Insert"
Step 7. Copy the code, return to blogger
Step 8. Create a new page (not post) with the title "Contact"
Step 9. In the "Edit HTML" editing paste the code copied from the form
Step 10. Save the page and verify that it works

Notes: If you have a page navigation menu, the new page will automatically be added as it is at this blog. If not, write to link to the new page and put the link in a prominent blog.

You can further improve the design of the form (new fields, template ...) and this is automatically updated in our blog page.

Enabling email notifications
For every form submitted, the system creates a new record in a spreadsheet automatically. Follow these steps to configure the notification system and alert you by email that you have a new contact.

    Go back to Google Docs and click on the Excel sheet associated with the form contact
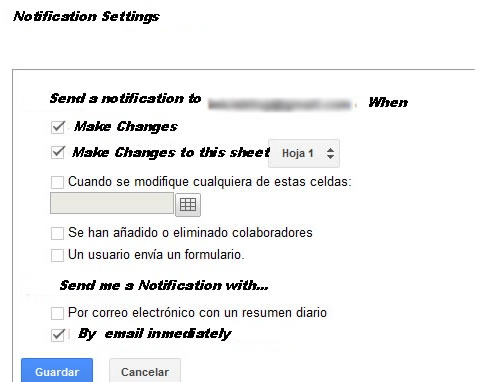
    Go to the Tools menu and click Notification Rules ...
    Mark the options as shown in the following graph:
notificaton form

Once configured the notifications just have to run a test yourself ... filled the form.


If you had any questions or problems leave comment in this same e
Enhanced by Zemanta

How Avoid The Same Description On Google Search

In this article we look at how to keep our post with the same description in Google result page, thus improving the SEO of our blog.


At Blogger you can indicate a description of the blog on the Settings tab and then description. This is highly recommended, but you must make a simple change to the HTML template so that this disclosure affects only the main blog address leaving as a description of each post the first paragraph of the same (156 characters), for this we will use a Simple conditional.

Do a search of your blog on Google to see if there is a problem

    In the search key Google Site: laurldetublog.blogspot.com
    Analyze the result. Here is a picture where you can see the problem


If you have configured Google WebMaster Tools, go to the Diagnostics tab and then click HTML suggestions and see where it says meta description should show the number of posts containing the same description. This is what we will address in this post.
search browser


Note: As you can see in the picture above, the description is the same in every post.

Steps to prevent all post show the same description

    Go to the Template tab and click Edit HTML button
    Find (Ctrl F or Ctrl B) this line in the code: CDATA [/ *
    Copy the following code and paste it just before the position where the previous line encontrastes:

    cond='data:blog.url <b:if data:blog.homepageUrl'> ==
       <meta content='Aquí must indicate the description of your blog' name='description'/>
    </ B: if>

Note: This code snippet should be in the head section ... </ head> blog. If you already have a fragment description is just add the condition.

Although it is a topic that is discussed in their day through this page, I have seen fit to make a post because of the importance from SEO perspective. Remember also that this issue (description and duplicate titles) is reported by the Webmaster Tools.

After applying the change to the template may take 1-2 weeks to see the new descriptions on the Google results page.

Finally thank the initiative of several followers of iniciaBlog for proposing this topic.

As always, I invite you to use comments to leave your opinion on this article. If you liked this post and want to be anywhere else, follow me via Facebook, Twitter, subscribe by email, Google Friend, RSS now also on Google +. Use social buttons at the bottom of the post to recommend it to your friends. Thank you! ;-)

Tuesday, April 30, 2013

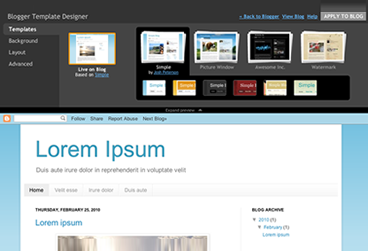
Blogger Template Designer

Time to talk about the overall design of your blog. At this point there are two ways, using the template designer blogger or incorporate a predesigned template ...

The truth is that before the appearance of the template designer blogger (March 2010) was practically mandatory search a predesigned template for blog, which would allow us to identify quickly.

First thing we do is to analyze the different elements that form part of the structure of our blog.

Blogger Template Designer     The General Fund blog. It can be a color or an image
     Header. It can be a text, an image or a combination of both. Remember that there is a Gadget to configure this section.
     Menu links or pages. Typically located after the header. Allows navigation through the blog and its pages. Remember you can create up to 10 pages for example to a web form, a guestbook, etc..
     The body. Formed by a zone where entries are posted and usually a vertical zone to the right of the entrance.
     The foot. It can consist of several blocks and will be positioned below the body of the blog

Then there are other elements such as typeface, etc.. All these aspects can be configured directly from the designer templates. With the added advantage that you can change on the fly any of these items, including the structure of the body (1 columa, 2 columns) foot or blog

For your reference, this blog has been improved using the blogger template designer. Everything you see, including the font were selected using this tool.

Here you have the video you used Google to announce this news (English)


Remember to start using the latest in Blogger before it is available to all users can access the administrator using http://blogger.com http://draft.blogger.com instead. Once you have accessed through draft will ask if you want to use as default desktop draft.

Obviously my recommendation is that you use the built-in template designer blogger (design tab). If after watching the video and try the tool does not stay convinced read on.

Free Templates for blogger:
The other alternative is to get a custom template based on the topic you are looking for then adapting tender. There are a variety of sites that offer free blogger templates. All these templates into account the different elements of the structure mentioned above.
Once you choose your template should incorporate through the Design tab and then Editor HTML. Press the Select Template button to load the XML file previously downloaded from any of the following sites:

Enhanced by Zemanta

Configure the Initial View Blog: Paragraph Most Miniature on Blogger

In this article, we will see how to set the initial view of your blog to display some text and a thumbnail is generated automatically from the contents of each of your post.

 Having an initial view of the optimum blog can help improve the loading speed of blog, positioning, and in this case, provide more direct content to your readers what affects the average time of each visit.

What is the purpose?
The goal is to apply on your blog the same configuration as I have in iniciaBlog.com. If you notice, I show my last ten post, offering a small paragraph and a thumbnail of it. This aspect led him trying for some time and am very satisfied. Many people have asked me about this so it's time to explain how.

Blogger Basic Settings to summarize the inputs

How to cut the post to show only a paragraph?
insert line break in Blogger
View full post on numerous initial view can be (is) crazy. It will be a very long view and compel the user to travel far to see the oldest post. Blog Your foot will be very low and is unsightly. To counter this, we must include in the post what is called a line break. The text that is above this jump will be displayed in your initial view, to read the rest, go into the post. To insert a line break, do the following:
blogger settings
    Edit the last of your tickets
    Identifies the point where you want to insert the line balance. (I do it after my first paragraph and before the image that accompanies each post)
    Moves the mouse cursor in the right place in the text where you will place the cut
    Click the Insert button newline (has an icon like a paper match)
    Save or publish your post with this jump
     View your blog to see the effect.


Note: If you choose the wrong place "cut", just indicate other position the cursor and press the same button. If you want to take the jump, stand in the paragraph below and hit the back button to remove it.

You must repeat this process with your previous post or at least the last ten (keep reading).

How to adjust the amount of post shown on the home page?

number of entries in blogger
The home page can be displayed from a post until you want. The problem is that they have few forcing your reader to advance in your publications by clicking above. The problem with having many (if you put full) is that your initial view can be infinite and will affect the loading speed of your blog. For your reference, in my case show the 10 latest publications. Follow these steps to adjust the amount of post to display on your blog:
post number homepage
    Go to the Settings tab
    Click Entries and Comments
    Indicates the number of entries you want to display on the first of the boxes
    Tap Save
    View your blog to see the effect


Configure the link text "Read More"

customize text link read more
You control what part of your post text and how much you let on in your entries initial view. Now let's customize the link "Read more" in its own language. To do this follow these steps:
how red more tab
    Go to the Design tab
    Click Edit in the Blog posts area
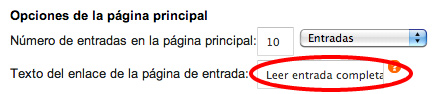
    In the Link text box, indicate what you want. I I have: Read full entry »
    Tap Save

This is free and your taste, the fact is that the greater the more importance you give sentence and that's good. Other examples I've seen "Click to continue reading" or "View Full Article".

Note that within this same section you can configure the amount of post you'll see on your initial view.

So far we've already taken a first step that maybe that's enough for your blog. Show the thumbnail is optional and I leave it to your discretion.

Show a thumbnail automatically
In order to display a thumbnail automatically from photos / video embedded in your post, we'll have to customize the HTML template to incorporate the necessary code and then apply a CSS style using the Blogger template designer. To do this follow these steps.

Add the HTML to display thumbnail:


  1.     Go to the Template tab
  2.     Click the Create button backup / restore
  3.  Create a backup of your current template
  4.   Once you have the copy, click Edit HTML button
  5.  Read the warning message and press Continue
  6.  Click where it says gadgets template Explandir
  7.   Use the key combination Ctrl F or Ctrl B (Mac ⌘ ⌘ F or B) to open the browser
  8.   Search <data:post.body/> within your template. If you find the text in two positions within your template, let you know that we are talking about first of all.
  9.    Copy the following code:
    <b:if cond='data:blog.pageType == "index"'>
<b:if cond='data:post.thumbnailUrl'>
<img class="postthumb" expr:src ="data:post.thumbnailUrl" expr:alt="data:post.title"/>
</b:if>
</b:if>

10. Paste it just before the line where we found <data:post.body/>
11.Save your template


Add a CSS style for the thumbnail:
designer blogger templates
We only have one last step to terminate this tutorial. After inserting the HTML code we will apply the CSS style to align the image, edges, etc.. To do this follow these steps:
     1. Go to the Template tab
     2.Click the Customize button to open the template editor
     3.Click Advanced (on left panel)
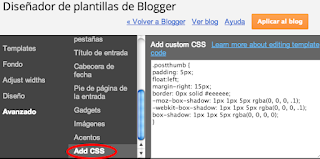
    4.Click add CSS to add a CSS style
     5.Copy the following code:

     . postthumb {padding: 5px; float: left; border: 1px solid # eeeeee;-moz-box-shadow: 1px 1px 5px rgba (0, 0, 0, 1),-webkit-box-shadow: 1px 1px 5px rgba (0, 0, 0, 1), box-shadow: 1px 1px 5px rgba (0, 0, 0, 1);}

     6.Go back to the editor and paste in the box you have in white (see this image
     7.Click Apply to blog and ready!

Note: If you want to surround the image with a border, change where it says border: 0px ..... for border: 1px ...
If you want a shadow changes the last line for this one: box-shadow: 1px 1px 5px rgba (0, 0, 0, 1);

If all went well, you've finished this tutorial. You just set up your blog with an initial view that includes the opening paragraph of each entry and a thumbnail automatically.

Did you know these settings Blogger? Have you already implemented this tutorial? Do you see it practical?
I would like to complete this article with your comment. Also if you consider it interesting to your friends and followers share used social buttons located at the foot of the article.


Enhanced by Zemanta

Monday, April 29, 2013

How To Show Guest Author Below Blog Post

The lack of time blog authors often have to rely on Guest posters. In return we offer them with quality back links and advertisement. In order to better serve them it is important to display some info about them in a polite and attractive manner.

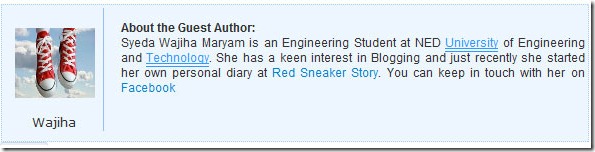
This will encourage more and more people to write quality articles for you. We are very selective in accepting tutorials written by our readers but once the tutorial qualifies we publish their post in the best manner possible. See the example below guest-author-info
To create this type of attractive box for your guest authors you would need to play with some  delicious CSS and HTML . So then Lets jump straight to the main part!

How To Create a Customized Author Info Box?


  1. Go To Blogger > Design > Edit HTML
  2. Back up your template
  3. Search for ]]></b:skin>
  4. Just above it paste the code below,
/*----------Guest Poster --------*/
.mbt-gp img {
margin:0;
border:0;
}
.mbt-gp-about {
font-size:12px;
margin:0 auto;
padding:3px;
width:580px;
background:#edf6ff;
border:#9ecfff dotted 1px;
min-height:130px;
}
.mbt-gp {
padding-top:10px;
margin:0;
font-size:12px;
float:left;
width:17%;
text-align:center;
border-right:#93C0F9 solid 1px;
}
.mbt-gp-text {
float:right;
width: 80%;
padding:5px;
text-align:left;
font:12px arial,sans-serif;
text-align:justify;
margin:0;
padding:0;
}

   5.    Save your template and jump to the next part of the tutorial.
How To Add The Author Info Box Below Guest Post?
Now whenever you publish a Guest post at your blog, simply switch to the Edit HTML Mode of your
Blogger Editor. And drag to the bottom of the HTML codes and just at the end add the code below,

  <div class="mbt-gp"><img src="GUEST-AUTHOR-IMAGE-LINK" width="80" height="70" /> GUEST-AUTHOR-NAME </div>
  <div class="mbt-gp-text">
    <p><strong>About the Guest Author:</strong>
      <br />ADD-DESCRIPTION-ABOUT-AUTHOR-INFO-HERE </p>
  </div>
</div> See the screenshot below to know better where to add the code,
author guest
Make sure you replace the bolded text with proper details. The image size would fit perfectly if it is 200px by 125px.

You will have to add just the second code for every guest post that you publish. Once you understand on how to do it then doing it again and again would become more like a fun. I just hope you find it useful and worth trying. 
Enhanced by Zemanta

Sunday, April 28, 2013

How To Place A Sticky Bar With Facebook Like Button

stickybar for bloggerThe previous version of sticky were well entertained and some of you asked how to add Facebook like button and Google Plus button to the stickybar. If you have already added the sticky bar then you just need to make few changes to your old code.

Only step#6 is different else all styling and HTML is the same which we used in our previous tutorials else you can try these new codes from start and delete the previous one.  Stickybar is just a custom version of hello bar but it has no Ads and can easily be styled and customized to blend your blog template.

 Since it is always better to have your own custom widgets therefore we designed this easy bar which sticks to the top of your blog or website to grab the attention of all visitors. Both these social plugins would help you increase your fan following. The Facebook like button will be linked to your fan page so that any like may turn out into a Fan. Lets get to work then!


Add Stickybar to Blogger


Follow these easy steps:
  1. Go To Blogger > Design > Edit HTML
  2. Backup your template
  3. Search for this
]]></b:skin>

   4.  Just above it paste the following CSS code,
/*Stickybar*/
#mbt_bar{
background:#0080ff url('https://blogger.googleusercontent.com/img/b/R29vZ2xl/AVvXsEhINBPA6PD1IzSMNUZiEjIPJw8YMo99C7bmyKz5BG-_o1fxkeVuTlpMuj-0Aw38sjzUEWWSeJu7E0GQE0ko5yCvTjLVBCEx7qcIa37Gz5kpK4FJqpHEWzFAaFPsngmwUJuh2L9R0aqwDTI/s400/stickybar.png') repeat-x;
width:100%;
margin:0 auto;
text-align:center;
padding:3px 0 0 0;
border-bottom: 1px solid #888888;
  -moz-box-shadow: #666666 0px 1px 3px;
  -webkit-box-shadow: #666666 0px 1px 3px;
  box-shadow: #666666 0px 1px 3px;
  z-index: 999;
height: 28px; position:fixed;
line-height: 1.85em;
vertical-align: baseline;
letter-spacing: 1px;
color:#fff;
font-size:12px;
font-weight:bold;
font-family: arial,"Helvetica",sans-serif;
}
#mbt_bar a{
text-decoration:underline;
color:#E2E504;
}
#mbt_bar a:hover{
text-decoration:none;
}
#mbt_bar p {margin:0; list-style:none;}
#mbt_bar img {vertical-align: middle;
      margin-right: 6px;}


Next search for </head>   and paste the following Javascript code just above it
<script type='text/javascript'>
//<![CDATA[
var mbt_arr = new Array();
var mbt_clear = new Array();
function mbtFloat(mbt) {
mbt_arr[mbt_arr.length] = this;
var mbtpointer = eval(mbt_arr.length-1);
this.pagetop = 0;
this.cmode = (document.compatMode && document.compatMode!="BackCompat") ? document.documentElement : document.body;
this.mbtsrc = document.all? document.all[mbt] : document.getElementById(mbt);
this.mbtsrc.height = this.mbtsrc.offsetHeight;
this.mbtheight = this.cmode.clientHeight;
this.mbtoffset = mbtGetOffsetY(mbt_arr[mbtpointer]);
var mbtbar = 'mbt_clear['+mbtpointer+'] = setInterval("mbtFloatInit(mbt_arr['+mbtpointer+'])",1);';
mbtbar = mbtbar;
eval(mbtbar);
}
function mbtGetOffsetY(mbt) {
var mtaTotOffset = parseInt(mbt.mbtsrc.offsetTop);
var parentOffset = mbt.mbtsrc.offsetParent;
while ( parentOffset != null ) {
mbtTotOffset += parentOffset.offsetTop;
parentOffset = parentOffset.offsetParent;
}
return mbtTotOffset;
}
function mbtFloatInit(mbt) {
mbt.pagetop = mbt.cmode.scrollTop;
mbt.mbtsrc.style.top = mbt.pagetop - mbt.mbtoffset + "px";
}
function closeTopAds() {
document.getElementById("mbt_bar").style.visibility = "hidden";
}
//]]>
</script>
   Then search for <body>  and just below it paste the following HTML code
<div id='mbt_bar'> <span style='padding-right:5px; float:right'> <img align='absmiddle' border='0' onClick='closeTopAdsundefined);return false;' src='https://blogger.googleusercontent.com/img/b/R29vZ2xl/AVvXsEio4PMTR-rxCpW9YuAS0dD5TghzyOgEqB9USkhpeA2CH3eFCU_VFA77GjCwFMim0DKHPz9NV4oKWg6U-7UhQmXRX2D4bl0lLRvr6kZEscdJ0gbGCBN-Q6I3x_-hsWc_tMvB_QbWT4rd3AM/s400/cancel.png' style='cursor:hand;cursor:pointer;'/></span><div style='float:left; padding-left:10px;'>Stickybar with social Plugins</div> <div style='float:right; padding-right:0px;'> <p style='font:bold 12px arial; float:left; margin:5px;'>Liked us?</p><iframe allowTransparency='true' frameborder='0' scrolling='no' src='http://www.facebook.com/plugins/like.php?href=https%3A%2F%2Fwww.facebook.com%2Ftrucosdeblogger&amp;send=false&amp;layout=button_count&amp;width=80&amp; show_faces=false&amp;action=like&amp;colorscheme=light&amp;font&amp;height=21' style='border:none; overflow:hidden; width:80px; height:21px;'/> <g:plusone href='http://tricksblogspot.blogspot.com' size='medium'/> </div> </div>


You can write your message, announcement, anything you like instead of that purple text.
Replace blogger tricks with your Facebook Fan Page Username  and replace our blog link with yours.
    Note: Skip this step if you have already added google+ button somewhere already in your blog.
Paste the following code just below ]]></b:skin>

 <script src='http://apis.google.com/js/plusone.js' type='text/javascript'> {lang: &#39;en-US&#39;} </script>

 8. Save your template and you are all done! Visit your blogs to see it fixed at top just perfectly


Enhanced by Zemanta

Wednesday, April 3, 2013

What is a blog and what is for?

Image representing Blogger as depicted in Crun...
Image via CrunchBase
What is a Blog?
A blog is nothing more nor less than a diary. This diary can be personal or have a more commercial and corporate.

Every time you write something new you do it in a new page or what is called Post or input. , The most important is the content, quality and should be attractive both in substance and in form.

What things do I can write on the blog?

    On products, news, events and milestones of your store or business.
    About gardening, photography, sports, crafts, mechanics.
    On technology, travel, fashion, news, poetry, art, music, cinema.
    About family, children.

In each entry as part of the text, you can insert photos, videos and audio.

Which is more important the content or design of the blog?
Certainly both are important but should give priority to the content must be original content as I said before (no copies) and quality. You must be clear about what to write, who you're going to lead, shape and purpose of the blog. Finally you must be consistent and write if not every day in several a week. Actually the latter is the most important, how to write or who the wrath perfected over time. With regard to design what angers slowly improving but can not be the priority.

Google Blogger 
Now you need a manager for the blog, and that is when I introduce Google Blogger. This service (Blogger), you can create blogs, create and edit entries or post, customize the design of it, you can configure it to indicate whether such a blog is public or private to certain people ... The most important thing, so free and also over time your post will appear in the Google search engine.

Therefore we conclude that a blog is the most economical way to have an Internet presence, and is applicable to all whether you are an individual, entrepreneurial, independent or company. If you want to create a blog user community should be the focus of your strategy.

What do I need to create a blog?
Enthusiasm for what you are going to undertake and dedication to keep
A Gmail (Google Mail). If not, you can create it from here.

You do not need:
No need to know HTML or Web programming.
You do not need a hosting (hosting) and it gives you Google for free.
You do not need a domain, when you create your blog Google assigns you one free on the start. Example www.one.blogspot.com (later you can change by a. Com)

Steps to create the blog:
Connect with blogger and follow the wizard until you write your first post. When you publish, you have already created your blog and have a web address or url where invite your friends.

Of course I recommend you follow this blog because it is, how to start a blog and what aspects should be given slowly. All items listed on this blog are explained in subsequent entries. We will see interesting subjects like button "Like" on Facebook at each entrance or how to put social icons and even a music player.

Tuesday, April 2, 2013

Hover Effects to Your Blogger Blog Images

Add  different effects to those photos.The COOL thing about this is you just have to add some jQuery and Css to your template then you can easily add from Five hover effects to add some live to your blog photos.

Lets look through the effects and you can also check out this sample in action here.

The 5 effects will be :

Effect 1 - Popout, this is a basic pop out effect on hover the photos will pop out from the page.
Effect 2 - SliceDown, The image will have an dark overlay and on hover a slice effect reveals the image clearly.
Effect 3 - BoxRandom, The image has a light overlay and on hover the image is revealed by boxes randomly clearing.
Effect 4 - FoldLeft, Once again the image has a light overlay and this time on hover an accordion fold effect reveals the image.
Effect 5 - RainGrowReverse, This time on hover the image is revealed from corner to corner.


Add The PICS Effects To YOUR Blogger

Note:Remember Always Back Up Your Template Before You Make Changes - How To Back Up A Blogger Template

Step 1. In Your (New Design) Blogger Dashboard- Click The Drop Down Menu For Your Blog > Choose Template > Then Edit Html >

Step 2. Find this piece of code in your blogs Html : (Click Ctrl and F for a search bar to help find the code - How To Find Code In Blogger Template Template)

    </head>


Step 3. Copy and Paste the following code Directly Above / Before </head>
---------------------------------------------------------------------------------------------------------------------
    <script src='http://code.jquery.com/jquery-1.7.1.min.js' type='text/javascript'/>
    <script src='http://yourjavascript.com/143237963/jquery.adipoli.min.js' type='text/javascript'/>
    <script type='text/javascript'>
    /*<![CDATA[*/
    jQuery(function($pice){
    $pice('.effect1').adipoli({
    'startEffect' : 'normal',
    'hoverEffect' : 'popout'
    });
    $pice('.effect2').adipoli({
    'startEffect' : 'overlay',
    'hoverEffect' : 'sliceDown'
    });
    $pice('.effect3').adipoli({
    'startEffect' : 'transparent',
    'hoverEffect' : 'boxRandom'
    });
    $pice('.effect4').adipoli({
    'startEffect' : 'overlay',
    'hoverEffect' : 'foldLeft'
    });
    $pice('.effect5').adipoli({
    'startEffect' : 'transparent',
    'hoverEffect' : 'boxRainGrowReverse'
    });

    });
    /*]]>*/

    </script>

Step 4. Find the following piece of code in your blogs Html : (Click Ctrl and F for a search bar to help find the code - How To Find Code In Blogger Template Template)

    ]]></b:skin>


Step 5. Now Copy And Paste This Code Directly Above / Before ]]></b:skin>

    .adipoli-wrapper{position:relative;display:inline-block;margin:auto}
    .adipoli-slice{display:block;position:absolute;z-index:0;height:100%}
    .adipoli-box{display:block;position:absolute;z-index:0}
    .post img{border:0!important;margin:0!important;padding:0!important}
    .adipoli-wrapper>img,.adipoli-before,.adipoli-after{position:absolute;z-index:0}


Step 6. Save your template.

How to Add The Effect To Your Pics

Now we need to add a class tag to pics we want the effect on.So as you seen them on the demo ; if you want to use Effect 1 you add class="effect1" for Effect 2 you add class="effect2" and so on.Below I show were to add this class tag on your pics.

Then if your upload the pics or images directly onto Blogger we have an easy way to add the class.The code below is how the html for an image looks when uploaded to Blogger.

Important - This is when you upload the image in compose mode then switch to html mode.

    <div class="separator" style="clear: both; text-align: center;">
    <a href="https://blogger.googleusercontent.com/img/b/R29vZ2xl/AVvXsEhTspqHJ7VFYX65NEe_ZksRAZ5AaXH-DFXtijn8jEYjisgyQON8ref5VlcY-yFzol_nfQzanSKSPrV3iQS0pBptd6D0IyorWh36L8sVE5K_FOFR44ZWTr49d1YG_afsbG1vHSrf5vG2YxAb/s1600/image-effects-image-2.png" imageanchor="1" style="margin-left: 1em; margin-right: 1em;"><img border="0" src="https://blogger.googleusercontent.com/img/b/R29vZ2xl/AVvXsEhTspqHJ7VFYX65NEe_ZksRAZ5AaXH-DFXtijn8jEYjisgyQON8ref5VlcY-yFzol_nfQzanSKSPrV3iQS0pBptd6D0IyorWh36L8sVE5K_FOFR44ZWTr49d1YG_afsbG1vHSrf5vG2YxAb/s1600/image-effects-image-2.png" /></a></div>


You can see highlighted div class="separator" we change this to div class="effect1" (or effect2 etc..) like this below :

    <div class="effect1" style="clear: both; text-align: center;">
    <a href="https://blogger.googleusercontent.com/img/b/R29vZ2xl/AVvXsEhTspqHJ7VFYX65NEe_ZksRAZ5AaXH-DFXtijn8jEYjisgyQON8ref5VlcY-yFzol_nfQzanSKSPrV3iQS0pBptd6D0IyorWh36L8sVE5K_FOFR44ZWTr49d1YG_afsbG1vHSrf5vG2YxAb/s1600/image-effects-image-2.png" imageanchor="1" style="margin-left: 1em; margin-right: 1em;"><img border="0" src="https://blogger.googleusercontent.com/img/b/R29vZ2xl/AVvXsEhTspqHJ7VFYX65NEe_ZksRAZ5AaXH-DFXtijn8jEYjisgyQON8ref5VlcY-yFzol_nfQzanSKSPrV3iQS0pBptd6D0IyorWh36L8sVE5K_FOFR44ZWTr49d1YG_afsbG1vHSrf5vG2YxAb/s1600/image-effects-image-2.png" /></a></div>


When you add pics or images in html mode or adding externally hosted images your image code will be like this :

    <a href="https://blogger.googleusercontent.com/img/b/R29vZ2xl/AVvXsEhTspqHJ7VFYX65NEe_ZksRAZ5AaXH-DFXtijn8jEYjisgyQON8ref5VlcY-yFzol_nfQzanSKSPrV3iQS0pBptd6D0IyorWh36L8sVE5K_FOFR44ZWTr49d1YG_afsbG1vHSrf5vG2YxAb/s1600/image-effects-image-2.png"><img src="https://blogger.googleusercontent.com/img/b/R29vZ2xl/AVvXsEhTspqHJ7VFYX65NEe_ZksRAZ5AaXH-DFXtijn8jEYjisgyQON8ref5VlcY-yFzol_nfQzanSKSPrV3iQS0pBptd6D0IyorWh36L8sVE5K_FOFR44ZWTr49d1YG_afsbG1vHSrf5vG2YxAb/s1600/image-effects-image-2.png" /></a>


We add the class as shown below :

    <a href="https://blogger.googleusercontent.com/img/b/R29vZ2xl/AVvXsEhTspqHJ7VFYX65NEe_ZksRAZ5AaXH-DFXtijn8jEYjisgyQON8ref5VlcY-yFzol_nfQzanSKSPrV3iQS0pBptd6D0IyorWh36L8sVE5K_FOFR44ZWTr49d1YG_afsbG1vHSrf5vG2YxAb/s1600/image-effects-image-2.png"><img class="effect1" src="https://blogger.googleusercontent.com/img/b/R29vZ2xl/AVvXsEhTspqHJ7VFYX65NEe_ZksRAZ5AaXH-DFXtijn8jEYjisgyQON8ref5VlcY-yFzol_nfQzanSKSPrV3iQS0pBptd6D0IyorWh36L8sVE5K_FOFR44ZWTr49d1YG_afsbG1vHSrf5vG2YxAb/s1600/image-effects-image-2.png" /></a>


For this we used the idea from the Adipoli jQuery Image Hover Plugin.
Enhanced by Zemanta

Monday, April 1, 2013

How to put photos from Facebook fans on the blog?

In this article, we will see how to put the typical table showing the faces of the people (fans) who follow the blog through Facebook. It is what is called a "Like Box" ...

As you know, people of Facebook has a page specifically dedicated to developers, who can enable social elements into your blog or website. It is highly recommended not to use it even know initially.
We summarize the different elements that can be found:

    Like Button: The button that we put in each blog entry
    Activity Feed. Shows a box wall with activity
    Recommendations. Displays a box with those wall postings with votes
    Like box. It is the example we are doing right now.
    Login Box. It's a login button of facebook account
    Registration. Create your user registry from your own Web (combined then with the Login Box)
    Comments. It's a box to post comments from your website or blog, these are posted on the wall
    Live stream. Ideal for live events and live, allows active participation of users. A kind of chat where you seeing what others are writing. Example broadcast of a sporting event where you have for example the video of a football game on the right have this Live Stream that allows real-time feedback. Penalty!, Penalty!, Lol.

Follow these steps to see a box with photos of fans in your blog or site:

    Open another browser tab your fan page
    Copy the web address (URL) in the navigation bar of the browser itself
    Connect with this page
    Where it says "Facebook Page URL" you must paste the address of your site on Facebook
    Set the various parameters
    Click the Get Code button, copy it (is a iframe)
    Design Go
    Add a Gadget of type HTML / Java Script Menu on the right.
    Paste the code into the Gadget
    Press the Save button and see your blog

Here's my example:

    <Iframe scrolling = "no" frameborder = "0" style = "border: none; overflow: hidden, width: 210px, height: 230px;" allowtransparency = "true"> </ iframe>


You can see it working right in the vertical menu, set the parameters of width (W) and height (h) to adjust and integrate into your site.


Note: Only works with Fan Pages (fanpages) not a personal profile.
Enhanced by Zemanta

Sunday, March 31, 2013

Optimize the title entries to promote SEO Blogger

Work positioning (SEO) starts a blog since we published the first post. This is one of the most complex issues, positioning a blog is a set of actions with results in the medium and long term. Remember that a good positioning means more visits to the blog, and therefore greater opportunity to "sell".

The SEO, a matter of small details
The default mode which displays the title of each post, does not favor the SEO. Then follow these easy improve the title of the entries in Blogger.

How to optimize the title of the entries in Blogger?
As long as we play the HTML template I recommend backup before. Follow these simple steps:

    Access the Template tab and click the Create button Backup / Restore
    Once you have created your copy , press the Edit HTML
     (Mac in Mac ⌘ ⌘ F or B)Keyboard and press Ctrl F or Ctrl B and search for:

       <title> <data:blog.pageTitle/> </ title>

    Replaces code found by the following:

    <b:if cond='data:blog.pageType == &quot;item&quot;'>         <title><data:blog.pageName/> | <data:blog.title/></title><b:else/>       
         <title><data:blog.pageTitle/>
</title>
</b:if>


   Now  Save the template and view your blog


Now when you enter one of your post, look at the title that appears in the browser, at the top. It Put the title of the post first and then the name of the blog. It is this kind of details that favor the SEO of your blog.
Enhanced by Zemanta

Saturday, March 30, 2013

The Trick to Add Blogger With Thumbnails

This time an alternative Trick that show a

Blogger with Thumbnails

  quite reliable tool for the template.


How to add Blogger?


First, let'' Design | Edit HTML'', where'' mark'' Expand Widget Templates. Look for the following area:
</ Head>

Above this, will Paste the following code:

<b:if cond='data:blog.pageType == &quot;item&quot;'>
<style type="text/css">
#related-posts {
float:center;
text-transform:none;
height:100%;
min-height:100%;
padding-top:5px;
padding-left:5px;
}

#related-posts h2{
font-size: 1.6em;
font-weight: bold;
color: black;
font-family: Georgia, “Times New Roman”, Times, serif;
margin-bottom: 0.75em;
margin-top: 0em;
padding-top: 0em;
}
#related-posts a{
color:black;
}
#related-posts a:hover{
color:black;
}

#related-posts  a:hover {
background-color:#d4eaf2;
}
</style>
<script type='text/javascript'>
var defaultnoimage="http://2.bp.blogspot.com/-R285B_Pf0q4/TbXKNLTdA8I/AAAAAAAAAzk/9cKeL67QAzc/s1600/sinimagen.jpg";
var maxresults=5;
var splittercolor="#d4eaf2";
var relatedpoststitle="Entradas relacionadas:";
</script>
<script src='https://sites.google.com/a/blogsydescargas.co.cc/ayudabloggers/scripts2/posts-relacionados-blogger.js' type='text/javascript'/>
</b:if>

Now find the following line:

<div class='post-footer-line post-footer-line-1'>

If you can not find it, look this one:

<p class='post-footer-line post-footer-line-1'>


Below this, paste the following code:


 <b:if cond='data:blog.pageType == &quot;item&quot;'>
<div id='related-posts'>
<b:loop values='data:post.labels' var='label'>
<b:if cond='data:label.isLast != &quot;true&quot;'>
</b:if>
<script expr:src='&quot;/feeds/posts/default/-/&quot; + data:label.name + &quot;?alt=json-in-script&amp;callback=related_results_labels_thumbs&amp;max-results=6&quot;' type='text/javascript'/></b:loop>
<script type='text/javascript'>
removeRelatedDuplicates_thumbs();
printRelatedLabels_thumbs(&quot;<data:post.url/>&quot;);
</script>
</div><div style='clear:both'/>
</b:if>


Note:
If you want to change the number of entries that replaces the number displayed in the following area:

max-results=6

  if you want to replace the image that appears when an entry does not contain any, replaces the following URL for the desired:

 http://tricksblogspot.com/-R285B_Pf0q4/TbXKNLTdA8I/AAAAAAAAAzk/9cKeL67QAzc/s1600/sinimagen.jpg


Enhanced by Zemanta

Making a 404 Error Custom Page Not Found Trick

Design 404 Error Page For
English: 404 Error Symbol Deutsch: 404 Fehler ...
English: 404 Error Symbol Deutsch: 404 Fehler Symbol (Photo credit: Wikipedia)
Blogger

The 404 page will prompt visitors that he has landed a page not found and will provide him three important options which are:
  • Go Back to the page from where he came from. We will use JavaScript here.
  • Contact the Admin and inform him about the broken link. This will help you track broken links
  • And finally to provide a link to homepage.
Lets get to work to achieve all the above. Simply follow the easy steps below to display 404 error message uniquely.
  1. Go To draft.blogger.com > Settings > Search Preferences
  2. Click on Edit link next to : Custom Page Not Found
  3. Inside the box paste the following code: 
---------------------------------------------------------------------------------------------------------------
<!-- MBT Default Template -->
<div class='MBT-404-box'>
  <p style='line-height: 30px'><strong>
<font color='#ff0000' size='5'>
Oops!
</font> <font color='#666666'>
Looks like you either clicked a broken link or a Page that no more exits. Kindly do one of the followings:
</font></strong></p>
  <ol style='line-height: 25px'>
    <li><a href='javascript:history.go(-1)'>&#171; Go Back</a> </li>
    <li>Report the Problem to us by <a href='http://contact.tricksblogspot.blogspot.com'>Clicking Here</a>&#160;&#160;&#160; (<em>This will help us serve you even better</em>) </li>
    <li>Go To Homepage by <a href='http://www.tricksblogspot.blogspot.com'>Clicking Here</a>
      <br/></li>
  </ol>
  <p>
    <br/>
    <br/>
    <br/></p>
  <p align='center'><font color='#0080ff' style='font-size: 150px'><strong>404</strong></font></p>
  <p>&#160;</p>
  <p align='center'/>
  <p align='center'><font size='5'>Page Not Found!</font></p>
</div>
         Make these customizations:
  • You can edit the bolded texts with anything you like
  • Replace http://contact.tricksblogspot.blogspot.com with link of your contact page
  • Replace http://www.tricksblogspot.blogspot.com with your homepage link
   4.   Click the Save changes  button and you are half way done.
    5.  Go to Template > Edit HTML
   6.   Search for this ]]></b:skin>
    7.  Just below it paste the following code stylsheet code:
---------------------------------------------------------------------------------------------------
<b:if cond='data:blog.pageType == &quot;error_page&quot;'>
<style type='text/css'>
.status-msg-wrap {
    font-size: 100%;
    margin: none;
    position: static;
    width: 100%;
}
.status-msg-border {
    display:none
}
.status-msg-body {
    padding: none;
    position: static;
    text-align: inherit;
    width: 100%;
    z-index: auto;
}
.status-msg-wrap a {
    padding: none;
    text-decoration: inherit;
}
.MBT-404-box {
  background:#FFFFFF;
  width:98%;
  margin:10px 0px;
  padding:20px 10px;
  border:1px solid #ddd;
  -moz-border-radius:6px;
  -webkit-border-radius:6px;
  border-radius:6px;
  box-shadow: 5px 5px 5px #CCCCCC;
}
</style>
</b:if>
-----------------------------------------------------------------------------------------------------------------
     To change the background color of the box edit #FFFFFF
    8.   Save your template
    9.   Done!

Enhanced by Zemanta

The Trick to Change Image On Blogger

How to make an image clickable?

The complete clickable image code looks like this,
<a href="LANDING URL" target="_blank">Image LINK" width="" height=""  alt=""  title="" border="0" /></a>


  • Where refers to where will the image take the user when it is clicked.
  • Where IMAGE LINK refers to the URL of your picture
  • width="" and height="" has to be given proper values in pixels
  • alt="" is alternative text tag that you right to tell search engine robots what the image is about
  • title="" is the name of the image that appears on mouse hover. It is always kept the same as the alt=""
  • border="0" ensures that no border or outline appears across the image
For example for the image below I have used the following code,
<a href="http://tricksblogspot.blogspot.com/" target="_blank"><img src="IMAGE LINK" width="240px" height="180px"  alt="Clickable Horse image" title="Clickable Horse image" border="0" /></a>


When you click the image, it will take you to our homepage. Else if you want to link to the original size of image then use this code,


<a href="IMAGE LINK" target="_blank"><img src="IMAGE LINK" width="240px" height="180px"  alt="Clickable Horse image" title="Clickable Horse image" border="0" /></a>
Clicking the image below will show you its original size.
world globe


How to make the same image un-clickable?

To make any image un-clickable simply remove the href linking tag. After removing the landing address tag we get,
<img src="IMAGE LINK" width="" height=""  alt=""  title="" border="0" />
You will see that the image is no more clickable. and the code I used this time is the same one but without the href tag,
<img src="IMAGE LINK" width="240px" height="180px"  alt="unclickable Horse image" title="unclickable Horse image" border="0" />


unclickable Koala image


How to make an image fade in and fade out?

For this you will need to add a tiny CSS3 code to your template. So kindly follow these steps,
  1. Go To Blogger> Design > Edit HTML
  2. Backup your template
  3. Search for ]]></b:skin>
  4. Add the code below just above it


/*---MBT FADE OUT CODE ----*/
.Fadeout img {
filter:alpha(opacity=100);
opacity: 0.3;
border:0;
}
.Fadeout:hover img {
filter:alpha(opacity=30);
opacity:1.0;
border:0;
}
/*---MBT FADE IN CODE ----*/
.Fadein img {
filter:alpha(opacity=30);
opacity: 1.0;
border:0;
}
.Fadein:hover img {
filter:alpha(opacity=100);
opacity:0.3;
border:0;
}


    5.  Save your template.


Now whenever you wish to add the fading effect to your image then simply insert an additional code to the same Clickable image code that we discussed above.
To make the image Fade out simply insert class="Fadeout" to your image code like this,
<a class="Fadeout" href="LANDING URL" target="_blank"><img src="IMAGE LINK" width="" height=""  alt=""  title="" border="0" /></a>

See an example below. (Hover your mouse cursor on it)


To make the image Fade in simply insert class="Fadein" to your image code like this,
<a class="Fadein" href="LANDING URL" target="_blank"><img src="IMAGE LINK" width="" height=""  alt=""  title="" border="0" /></a>

See an example,


I hope you find it useful. If you wanted to know where to save your images or to get IMAGE Links then read this post,
Enhanced by Zemanta

Botones Isometricos de Social Media


Barra Lateral Fija