Welcome Enjoy Tutorials

Liked us?

Tuesday, April 30, 2013

Vistaprint Offers Free Business Cards for Your Blog

vistaprintA business card is a tangible item associated with your blog and represents everything a formal gesture of invitation when you offer a person in the middle of a conversation. You're telling ... -this is me, this is my look (thanks to the logo and design) and here you can see what I do and how to contact me.

Say goodbye to the typical bar napkin where you're writing again and again your blog address when you run into a friend, and you always have to ask the waiter the pen. You are giving a bad image, and that you've dedicated countless hours to your blog, however the first contact your masterpiece with your friend is a simple napkin.

I want you to meet a service that can come in handy for your interests to turn your blog into your business, this is Vistaprint. Vistaprint is an online printing and offers a number of totally free products among which 250 Name Card Free. You can choose from over 40 different designs and using a wizard will incorporate contact details (company name, blog address, phone, email, etc.). You can also take advantage of the free order and free also incorporate other elements (pen holder card holder, key chain, etc.). All for free and only pay the shipping amount.

If you are someone who does not have clear logo or image free templates are a great alternative, and the print quality and the material used is very professional. If you have your own logo and you can load it using Premium cards have very competitive prices.

About the purchasing process
The whole process is very clear you can make changes to any of the articles in the last step even shopping, even once the order have a deadline to change it. Finally pay shipping costs, in my case about 6 euros and ready.

Thanks to one of the comments in this post, keep in mind that Vistaprint is a sales machine, so that during the preparation of your order the wizard offers you items that are extra, so check the order before finally to confirm. Depending on the shipping method you choose the result can be more expensive.


Now you have no excuses, your free card and also a personalized pen, so that it is no longer you will have to ask the waiter.

Enhanced by Zemanta

Blogger Template Designer

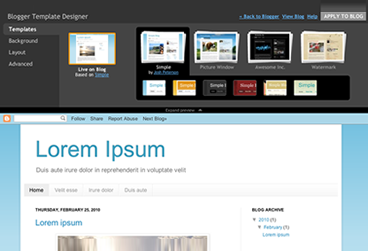
Time to talk about the overall design of your blog. At this point there are two ways, using the template designer blogger or incorporate a predesigned template ...

The truth is that before the appearance of the template designer blogger (March 2010) was practically mandatory search a predesigned template for blog, which would allow us to identify quickly.

First thing we do is to analyze the different elements that form part of the structure of our blog.

Blogger Template Designer     The General Fund blog. It can be a color or an image
     Header. It can be a text, an image or a combination of both. Remember that there is a Gadget to configure this section.
     Menu links or pages. Typically located after the header. Allows navigation through the blog and its pages. Remember you can create up to 10 pages for example to a web form, a guestbook, etc..
     The body. Formed by a zone where entries are posted and usually a vertical zone to the right of the entrance.
     The foot. It can consist of several blocks and will be positioned below the body of the blog

Then there are other elements such as typeface, etc.. All these aspects can be configured directly from the designer templates. With the added advantage that you can change on the fly any of these items, including the structure of the body (1 columa, 2 columns) foot or blog

For your reference, this blog has been improved using the blogger template designer. Everything you see, including the font were selected using this tool.

Here you have the video you used Google to announce this news (English)


Remember to start using the latest in Blogger before it is available to all users can access the administrator using http://blogger.com http://draft.blogger.com instead. Once you have accessed through draft will ask if you want to use as default desktop draft.

Obviously my recommendation is that you use the built-in template designer blogger (design tab). If after watching the video and try the tool does not stay convinced read on.

Free Templates for blogger:
The other alternative is to get a custom template based on the topic you are looking for then adapting tender. There are a variety of sites that offer free blogger templates. All these templates into account the different elements of the structure mentioned above.
Once you choose your template should incorporate through the Design tab and then Editor HTML. Press the Select Template button to load the XML file previously downloaded from any of the following sites:

Enhanced by Zemanta

QR Codes. What are, what they are and how to add them to the blog

QR codes (Quick Response) barcodes are able to store certain types of information such as a URL, SMS, Email, Text, etc.. However, I can not use the word again as these codes were created in 1994, but, thanks to the rise of the new (now if) SMARTHPHONE smartphones or these QR codes are again very very fashionable.


It's funny how every day without hardly realizing it, many of our daily activities like shopping, gym, to the movies ... the parking and many are managed quickly and accurately through codes bar. This will also happen with this code whose use at this time is innovative and very common soon will find it everywhere.


Creative business card with a QR code included
Here's an example, ... a business card .. if, if the lifetime. Well, if you say you can generate a QR code and encode in a URL for example to your blog or website and that when this code as printed on your business card is scanned by the camera causes a SmartPhone connect the phone directly to the website.


Another example is to create a QR code with your personal information (vCard), when read with the teléfomo, contact details of your card will like a magic trick is trying to phone contacts .... just wonderful fast, direct and without typing anything. By including this QR code into the design of your business card you've become an interactive object.

It is best that you see with your own eyes. The first video, it shows the different real-world applications that are already making this code. The second shows you a LG marketing campaign based on the use of such codes.

Video example of applying multiple uses QR codes:


What kind of information can be stored in QR codes?
Here the list of what you can store in a QR code:

    Contact (vCard). Name, company, phone, address ...
    A web address (URL). For example the blog, to the web or even your profile on Facebook, Twitter, Linkld, Youtube, etc..
    An email address.
    A message like SMS.
    A phone number to make a call.
    A text up to 350 characters
    Parameters wireless network access.
    Data from an event to a calendar (date and time of start / end event name ...)
    A Geolocation to see it on a map.

How I can generate a QR code?

There are many free online services. Below is a list of the ones I tested and I liked (all are in English):

    Zxing. It is clear, simple and allows you to download QR code generated
    QR4. Very flexible and can download the code vector file. Very professional
    Delivr QR Code Generator. It has everything you need, very clear interface.


What happens when read with mobile QR code?

When your SmartPhone read the QR code will cause an action according to the type of information stored in the code, ie connect to a web address or send an SMS message, create a calendar event, make a phone call, etc. .
Post. Your SmartPhone (Android, iPhone, BlackBerry) must have software to scan the code.

Now I have my QR code generated. Now what?

    Include it in your print ads, business cards, etc..
    Post it on the web or on the blog. Will achieve capture the attention of your visitors.
    Open your mind ... the possibilities are endless (see recommended readings)

Are you a marketing professional?
During the time I've been mulling over this topic, I came across QRky company that has an entire online platform available in Spanish, aimed at professionals. This service allows you, create your QR codes, know the statistics of the time in which the code has been read, where they read a map represented within. Also one of the errors "frequently" is once the code is printed on thousands of business cards, it should point to another web address, or the message that carries coded has a misspelling. With this platform you can create a universal QR code and switch the action without having to generate a new code.
You can evaluate QRky service completely free for a limited time getqrky.com

Google Currents can take your blog to iPhone, iPad and Android


This is an issue I've been mulling over a few months How to get blog posts are displayed optimally using a native application on iPhone, iPad, Android Smartphone and Tablets with Android?

What is Google Currents?
Google Currents is an application to be installed in any of the above mentioned devices from Android Market or from the Appstore as applicable.

Google Currents can subscribe to Publications. These editions are created using Google Currents Producer and this is where it gets really interesting as you can take advantage of RSS (Feed) of the blog as a source to create a new edition. But not only that, they also create other sections within your linked Edition Flickr, Picasa, YouTube, Google+ and all the RSS feeds you want.

We're actually doing a magazine or trade publication compatible with iPhone, iPad, Android and tablet all from a single service called Google Currents. I have found what I've been looking for so long, finally a service (from Google no more and no less) which ensures the correct display of the articles in my blog on these devices.

Google Currents is more than an RSS reader and the source is a repeat edition which in turn is composed of different sections (rss, photos, videos, articles, etc.).

You should see the following video of just over 1 minute to see how Google Currents. Each icon on the home screen are Editions.


After mastering this new service, we set to work to create our own from the Blog Edition.

How to create a Google Currents edition with the contents of the blog?

     1.Connect with Google Currents Producer (only from the Google Chrome browser)
     2.Accept the terms of use, you must fill out a short form
     3.The next step is to create a new edition using a form which asks:google currents
         Edition name
         RSS Feed
         (http://tublog.blogspot.com/atom.xml)
         Optionally Youtube channel
     4. Click the Create button to start the process of creating your new edition. You see this is a quick start wizard where it asks for two basic elements, the feed and a YouTube channel, you add more after more sections to your edition
    5. Once completed, the entire interface to access Google Currents Producer of where you should go reviewing and completing the information on the different tabs.
Interface Google Currents
I have highlighted in Red are those keys though of course you must go through each of them. Once you have your sections and you have it ready, the next step is the distribution. Which is to offer to the readers of your blog a link to subscribe to your issue from your device.

google currents
IniciaBlog editing Editing for iPad, iPhone and Android devices using Google Currents Producer
Obviously the first thing you should try is yourself, remember that requires that you have previously installed the Google Currents.

As you can see is a very good service that solves a complex issue. Followers of the blog will have a compatible editing on these devices also leveraging the power of each one of them.

From the Distribute tab you can get the link then you will promote to your readers.

Enhanced by Zemanta

Google Analytics For Statistics Blog

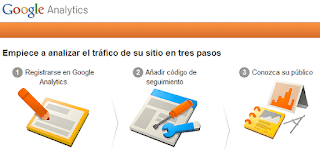
Google Analytics is a free service of Google analytics specialist websites using automatic data collection from visitors. Will be able to inform us about the number of visits, average time of the same, the pages viewed, unique visitors, visitor loyalty, location of users and so on.

What is the purpose of this tutorial?
If you've never used Google Analytics, the goal is to register an account and then ownership of your website / Blog. If you wore it before, you just need to add a new property. In both cases, we have to integrate a tracking code on the blog, which will collect all the information necessary to produce the statistics.

Do I really need if I just start the blog?

It is highly recommended, it is a necessity, even if your blog takes only a few days and visits published is not what you care about is more important for the future leave this task done from the beginning. Of course if your blog takes more time is urgent and you have the necessary configuration.
Tutorial. Steps to register your blog on Google Analytics
Step 1 and 2 of the tutorial is conditional on whether or not you were already user of Google Analytics.
1. Case 1. I am new, I never used Google Analytics
google analysis dashboard

    Access to Google Analytics
    Then it will show a wizard.
The first step is to register your account see image in step 1. After filling the data, press the Create Account button and continue at step 3 of this tutorial.

Two. Case 2. I already had an account set up in Google Analytics

    Access to Google Analytics
    Upon entering, select your account
    Click add new property. See display this step. Click the Create button property to subsequently obtain the tracking code.

Three. Get the tracking code (common for both cases)

    On the tracking code. Copy the code by right-clicking or Ctrl C provided on this page and go to siquiente step.

April. Paste the tracking code on the Blog

    Access Blogger
    Click Template tab
    Make a backup by clicking the "Create Backup / Restore"
    Click the Edit HTML button
    Click the Continue button
    Press the key combination Ctrl F or Ctrl B (Mac ⌘ ⌘ F or B) and looking
    Tracking code paste previously obtained just above the line found
    Save, view your blog, you should not be anything unusual

Once these steps, wait 24 hours and returns to access Google Analytics in order to verify that you are data on visits to your blog.

Enhanced by Zemanta

Configure the Initial View Blog: Paragraph Most Miniature on Blogger

In this article, we will see how to set the initial view of your blog to display some text and a thumbnail is generated automatically from the contents of each of your post.

 Having an initial view of the optimum blog can help improve the loading speed of blog, positioning, and in this case, provide more direct content to your readers what affects the average time of each visit.

What is the purpose?
The goal is to apply on your blog the same configuration as I have in iniciaBlog.com. If you notice, I show my last ten post, offering a small paragraph and a thumbnail of it. This aspect led him trying for some time and am very satisfied. Many people have asked me about this so it's time to explain how.

Blogger Basic Settings to summarize the inputs

How to cut the post to show only a paragraph?
insert line break in Blogger
View full post on numerous initial view can be (is) crazy. It will be a very long view and compel the user to travel far to see the oldest post. Blog Your foot will be very low and is unsightly. To counter this, we must include in the post what is called a line break. The text that is above this jump will be displayed in your initial view, to read the rest, go into the post. To insert a line break, do the following:
blogger settings
    Edit the last of your tickets
    Identifies the point where you want to insert the line balance. (I do it after my first paragraph and before the image that accompanies each post)
    Moves the mouse cursor in the right place in the text where you will place the cut
    Click the Insert button newline (has an icon like a paper match)
    Save or publish your post with this jump
     View your blog to see the effect.


Note: If you choose the wrong place "cut", just indicate other position the cursor and press the same button. If you want to take the jump, stand in the paragraph below and hit the back button to remove it.

You must repeat this process with your previous post or at least the last ten (keep reading).

How to adjust the amount of post shown on the home page?

number of entries in blogger
The home page can be displayed from a post until you want. The problem is that they have few forcing your reader to advance in your publications by clicking above. The problem with having many (if you put full) is that your initial view can be infinite and will affect the loading speed of your blog. For your reference, in my case show the 10 latest publications. Follow these steps to adjust the amount of post to display on your blog:
post number homepage
    Go to the Settings tab
    Click Entries and Comments
    Indicates the number of entries you want to display on the first of the boxes
    Tap Save
    View your blog to see the effect


Configure the link text "Read More"

customize text link read more
You control what part of your post text and how much you let on in your entries initial view. Now let's customize the link "Read more" in its own language. To do this follow these steps:
how red more tab
    Go to the Design tab
    Click Edit in the Blog posts area
    In the Link text box, indicate what you want. I I have: Read full entry »
    Tap Save

This is free and your taste, the fact is that the greater the more importance you give sentence and that's good. Other examples I've seen "Click to continue reading" or "View Full Article".

Note that within this same section you can configure the amount of post you'll see on your initial view.

So far we've already taken a first step that maybe that's enough for your blog. Show the thumbnail is optional and I leave it to your discretion.

Show a thumbnail automatically
In order to display a thumbnail automatically from photos / video embedded in your post, we'll have to customize the HTML template to incorporate the necessary code and then apply a CSS style using the Blogger template designer. To do this follow these steps.

Add the HTML to display thumbnail:


  1.     Go to the Template tab
  2.     Click the Create button backup / restore
  3.  Create a backup of your current template
  4.   Once you have the copy, click Edit HTML button
  5.  Read the warning message and press Continue
  6.  Click where it says gadgets template Explandir
  7.   Use the key combination Ctrl F or Ctrl B (Mac ⌘ ⌘ F or B) to open the browser
  8.   Search <data:post.body/> within your template. If you find the text in two positions within your template, let you know that we are talking about first of all.
  9.    Copy the following code:
    <b:if cond='data:blog.pageType == "index"'>
<b:if cond='data:post.thumbnailUrl'>
<img class="postthumb" expr:src ="data:post.thumbnailUrl" expr:alt="data:post.title"/>
</b:if>
</b:if>

10. Paste it just before the line where we found <data:post.body/>
11.Save your template


Add a CSS style for the thumbnail:
designer blogger templates
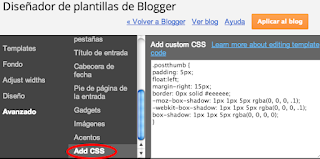
We only have one last step to terminate this tutorial. After inserting the HTML code we will apply the CSS style to align the image, edges, etc.. To do this follow these steps:
     1. Go to the Template tab
     2.Click the Customize button to open the template editor
     3.Click Advanced (on left panel)
    4.Click add CSS to add a CSS style
     5.Copy the following code:

     . postthumb {padding: 5px; float: left; border: 1px solid # eeeeee;-moz-box-shadow: 1px 1px 5px rgba (0, 0, 0, 1),-webkit-box-shadow: 1px 1px 5px rgba (0, 0, 0, 1), box-shadow: 1px 1px 5px rgba (0, 0, 0, 1);}

     6.Go back to the editor and paste in the box you have in white (see this image
     7.Click Apply to blog and ready!

Note: If you want to surround the image with a border, change where it says border: 0px ..... for border: 1px ...
If you want a shadow changes the last line for this one: box-shadow: 1px 1px 5px rgba (0, 0, 0, 1);

If all went well, you've finished this tutorial. You just set up your blog with an initial view that includes the opening paragraph of each entry and a thumbnail automatically.

Did you know these settings Blogger? Have you already implemented this tutorial? Do you see it practical?
I would like to complete this article with your comment. Also if you consider it interesting to your friends and followers share used social buttons located at the foot of the article.

Enhanced by Zemanta

Analysis and advice On Blogger Comments on Google+

English: Google+ wordmark
English: Google+ wordmark (Photo credit: Wikipedia)
 In this publication we will make an analysis of this change, the impact of which is from the point of view of the administration of the blog, for the impact it has for readers and also the scope of this novelty.


Blogger and Google+, Google+ and Blogger does not matter the order, the fact is that Google+ is Google's bid to compete to enter fully into the world of social networks and where they go most of new company developments . Sooner or later different service and products are integrated with Google+ iran.

Blogger is because it represents one of the most Google services integration with new social network has experienced in the last year, but not the only, the search engine, Gmail, YouTube, Google Analytics, webmaster tools , etc, etc.., have been in some way or another affected in favor of greater integration with Google+.
Enhanced by Zemanta

Monday, April 29, 2013

How To Show Guest Author Below Blog Post

The lack of time blog authors often have to rely on Guest posters. In return we offer them with quality back links and advertisement. In order to better serve them it is important to display some info about them in a polite and attractive manner.

This will encourage more and more people to write quality articles for you. We are very selective in accepting tutorials written by our readers but once the tutorial qualifies we publish their post in the best manner possible. See the example below guest-author-info
To create this type of attractive box for your guest authors you would need to play with some  delicious CSS and HTML . So then Lets jump straight to the main part!

How To Create a Customized Author Info Box?


  1. Go To Blogger > Design > Edit HTML
  2. Back up your template
  3. Search for ]]></b:skin>
  4. Just above it paste the code below,
/*----------Guest Poster --------*/
.mbt-gp img {
margin:0;
border:0;
}
.mbt-gp-about {
font-size:12px;
margin:0 auto;
padding:3px;
width:580px;
background:#edf6ff;
border:#9ecfff dotted 1px;
min-height:130px;
}
.mbt-gp {
padding-top:10px;
margin:0;
font-size:12px;
float:left;
width:17%;
text-align:center;
border-right:#93C0F9 solid 1px;
}
.mbt-gp-text {
float:right;
width: 80%;
padding:5px;
text-align:left;
font:12px arial,sans-serif;
text-align:justify;
margin:0;
padding:0;
}

   5.    Save your template and jump to the next part of the tutorial.
How To Add The Author Info Box Below Guest Post?
Now whenever you publish a Guest post at your blog, simply switch to the Edit HTML Mode of your
Blogger Editor. And drag to the bottom of the HTML codes and just at the end add the code below,

  <div class="mbt-gp"><img src="GUEST-AUTHOR-IMAGE-LINK" width="80" height="70" /> GUEST-AUTHOR-NAME </div>
  <div class="mbt-gp-text">
    <p><strong>About the Guest Author:</strong>
      <br />ADD-DESCRIPTION-ABOUT-AUTHOR-INFO-HERE </p>
  </div>
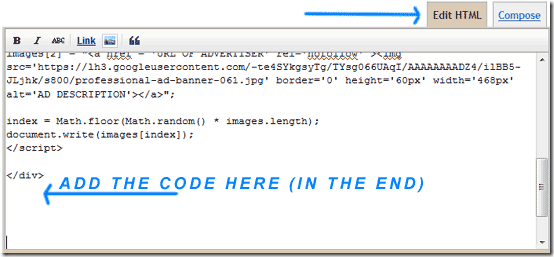
</div> See the screenshot below to know better where to add the code,
author guest
Make sure you replace the bolded text with proper details. The image size would fit perfectly if it is 200px by 125px.

You will have to add just the second code for every guest post that you publish. Once you understand on how to do it then doing it again and again would become more like a fun. I just hope you find it useful and worth trying. 
Enhanced by Zemanta

Sunday, April 28, 2013

How To Place A Sticky Bar With Facebook Like Button

stickybar for bloggerThe previous version of sticky were well entertained and some of you asked how to add Facebook like button and Google Plus button to the stickybar. If you have already added the sticky bar then you just need to make few changes to your old code.

Only step#6 is different else all styling and HTML is the same which we used in our previous tutorials else you can try these new codes from start and delete the previous one.  Stickybar is just a custom version of hello bar but it has no Ads and can easily be styled and customized to blend your blog template.

 Since it is always better to have your own custom widgets therefore we designed this easy bar which sticks to the top of your blog or website to grab the attention of all visitors. Both these social plugins would help you increase your fan following. The Facebook like button will be linked to your fan page so that any like may turn out into a Fan. Lets get to work then!


Add Stickybar to Blogger


Follow these easy steps:
  1. Go To Blogger > Design > Edit HTML
  2. Backup your template
  3. Search for this
]]></b:skin>

   4.  Just above it paste the following CSS code,
/*Stickybar*/
#mbt_bar{
background:#0080ff url('https://blogger.googleusercontent.com/img/b/R29vZ2xl/AVvXsEhINBPA6PD1IzSMNUZiEjIPJw8YMo99C7bmyKz5BG-_o1fxkeVuTlpMuj-0Aw38sjzUEWWSeJu7E0GQE0ko5yCvTjLVBCEx7qcIa37Gz5kpK4FJqpHEWzFAaFPsngmwUJuh2L9R0aqwDTI/s400/stickybar.png') repeat-x;
width:100%;
margin:0 auto;
text-align:center;
padding:3px 0 0 0;
border-bottom: 1px solid #888888;
  -moz-box-shadow: #666666 0px 1px 3px;
  -webkit-box-shadow: #666666 0px 1px 3px;
  box-shadow: #666666 0px 1px 3px;
  z-index: 999;
height: 28px; position:fixed;
line-height: 1.85em;
vertical-align: baseline;
letter-spacing: 1px;
color:#fff;
font-size:12px;
font-weight:bold;
font-family: arial,"Helvetica",sans-serif;
}
#mbt_bar a{
text-decoration:underline;
color:#E2E504;
}
#mbt_bar a:hover{
text-decoration:none;
}
#mbt_bar p {margin:0; list-style:none;}
#mbt_bar img {vertical-align: middle;
      margin-right: 6px;}


Next search for </head>   and paste the following Javascript code just above it
<script type='text/javascript'>
//<![CDATA[
var mbt_arr = new Array();
var mbt_clear = new Array();
function mbtFloat(mbt) {
mbt_arr[mbt_arr.length] = this;
var mbtpointer = eval(mbt_arr.length-1);
this.pagetop = 0;
this.cmode = (document.compatMode && document.compatMode!="BackCompat") ? document.documentElement : document.body;
this.mbtsrc = document.all? document.all[mbt] : document.getElementById(mbt);
this.mbtsrc.height = this.mbtsrc.offsetHeight;
this.mbtheight = this.cmode.clientHeight;
this.mbtoffset = mbtGetOffsetY(mbt_arr[mbtpointer]);
var mbtbar = 'mbt_clear['+mbtpointer+'] = setInterval("mbtFloatInit(mbt_arr['+mbtpointer+'])",1);';
mbtbar = mbtbar;
eval(mbtbar);
}
function mbtGetOffsetY(mbt) {
var mtaTotOffset = parseInt(mbt.mbtsrc.offsetTop);
var parentOffset = mbt.mbtsrc.offsetParent;
while ( parentOffset != null ) {
mbtTotOffset += parentOffset.offsetTop;
parentOffset = parentOffset.offsetParent;
}
return mbtTotOffset;
}
function mbtFloatInit(mbt) {
mbt.pagetop = mbt.cmode.scrollTop;
mbt.mbtsrc.style.top = mbt.pagetop - mbt.mbtoffset + "px";
}
function closeTopAds() {
document.getElementById("mbt_bar").style.visibility = "hidden";
}
//]]>
</script>
   Then search for <body>  and just below it paste the following HTML code
<div id='mbt_bar'> <span style='padding-right:5px; float:right'> <img align='absmiddle' border='0' onClick='closeTopAdsundefined);return false;' src='https://blogger.googleusercontent.com/img/b/R29vZ2xl/AVvXsEio4PMTR-rxCpW9YuAS0dD5TghzyOgEqB9USkhpeA2CH3eFCU_VFA77GjCwFMim0DKHPz9NV4oKWg6U-7UhQmXRX2D4bl0lLRvr6kZEscdJ0gbGCBN-Q6I3x_-hsWc_tMvB_QbWT4rd3AM/s400/cancel.png' style='cursor:hand;cursor:pointer;'/></span><div style='float:left; padding-left:10px;'>Stickybar with social Plugins</div> <div style='float:right; padding-right:0px;'> <p style='font:bold 12px arial; float:left; margin:5px;'>Liked us?</p><iframe allowTransparency='true' frameborder='0' scrolling='no' src='http://www.facebook.com/plugins/like.php?href=https%3A%2F%2Fwww.facebook.com%2Ftrucosdeblogger&amp;send=false&amp;layout=button_count&amp;width=80&amp; show_faces=false&amp;action=like&amp;colorscheme=light&amp;font&amp;height=21' style='border:none; overflow:hidden; width:80px; height:21px;'/> <g:plusone href='http://tricksblogspot.blogspot.com' size='medium'/> </div> </div>


You can write your message, announcement, anything you like instead of that purple text.
Replace blogger tricks with your Facebook Fan Page Username  and replace our blog link with yours.
    Note: Skip this step if you have already added google+ button somewhere already in your blog.
Paste the following code just below ]]></b:skin>

 <script src='http://apis.google.com/js/plusone.js' type='text/javascript'> {lang: &#39;en-US&#39;} </script>

 8. Save your template and you are all done! Visit your blogs to see it fixed at top just perfectly


Enhanced by Zemanta

One Tip Solution To Solve Google Sitemap Feed Proxy Errors

Most or all know how to submit your blog sitemap to Google if not you can Google for it and can find a lot of tutorials on this single topic but something that most of you might have observed are the Google Sitemap Errors! How do you solve them? Why so many errors when you have done everything the right way? The answer is simple , read on.
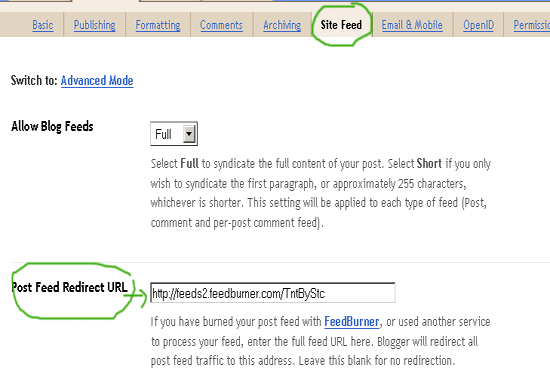
What actually happens is the fact that most bloggers burn their feeds at feedburner despite the default Atom feed system provided by Blogger. So most bloggers have redirected their default feeds to feedburner as shown below,

redirecting-site-feed
When we submit our RSS or Atom feeds at Google Webmaster Tools Site we are actually submitting the redirected feed hosted by feedburner. The disadvantage of doing so is that when Google Robot crawls your blog it basically indexes the data provided by the default BlogSpot feed system but since you have redirected your default feeds to feedburner, Google robot has to contact two feed systems at a time! first from BlogSpot and then from Feedbuner and thus it turns out into a confusion and results as Feed Proxy Errors which is surely a headache for every newbie blogger. Unfortunately the internet has almost rare tutorials on this issue. The reason behind doing a professional SEO course was indeed learning how to solve all such problems. Luckily I have come up with a solution.
The mistake everyone makes is by adding the following sitemap data,
http://YOURBLOGNAME.blogspot.com/rss.xml
OR
http://YOURBLOGNAME.blogspot.com/atom.xml
But this results in dozens of feed proxy errors. To solve this issue simply submit the following sitemap data,
http://YOURBLOGNAME.blogspot.com/feeds/posts/default?redirect=false
Note:- You only need to add feeds/posts/default?redirect=false  because your blog URL will be added by default.
where , feeds/posts/default?redirect=false is the code that redirects Google only to the default BlogSpot Atom Feed system.
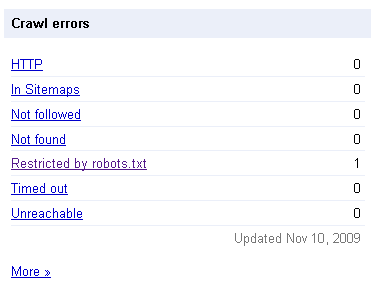
Finally the results for your blog will look like that for mine,
crawl errors
fully-indexed
Impressive isn’t it! Adopt the right method and you will see a positive change too. Search Engine do really count for 75% of the traffic to your blog so make sure you smoothen the path for them by optimizing your sitemap as guided in today’s post.
Enhanced by Zemanta

Wednesday, April 3, 2013

What is a blog and what is for?

Image representing Blogger as depicted in Crun...
Image via CrunchBase
What is a Blog?
A blog is nothing more nor less than a diary. This diary can be personal or have a more commercial and corporate.

Every time you write something new you do it in a new page or what is called Post or input. , The most important is the content, quality and should be attractive both in substance and in form.

What things do I can write on the blog?

    On products, news, events and milestones of your store or business.
    About gardening, photography, sports, crafts, mechanics.
    On technology, travel, fashion, news, poetry, art, music, cinema.
    About family, children.

In each entry as part of the text, you can insert photos, videos and audio.

Which is more important the content or design of the blog?
Certainly both are important but should give priority to the content must be original content as I said before (no copies) and quality. You must be clear about what to write, who you're going to lead, shape and purpose of the blog. Finally you must be consistent and write if not every day in several a week. Actually the latter is the most important, how to write or who the wrath perfected over time. With regard to design what angers slowly improving but can not be the priority.

Google Blogger 
Now you need a manager for the blog, and that is when I introduce Google Blogger. This service (Blogger), you can create blogs, create and edit entries or post, customize the design of it, you can configure it to indicate whether such a blog is public or private to certain people ... The most important thing, so free and also over time your post will appear in the Google search engine.

Therefore we conclude that a blog is the most economical way to have an Internet presence, and is applicable to all whether you are an individual, entrepreneurial, independent or company. If you want to create a blog user community should be the focus of your strategy.

What do I need to create a blog?
Enthusiasm for what you are going to undertake and dedication to keep
A Gmail (Google Mail). If not, you can create it from here.

You do not need:
No need to know HTML or Web programming.
You do not need a hosting (hosting) and it gives you Google for free.
You do not need a domain, when you create your blog Google assigns you one free on the start. Example www.one.blogspot.com (later you can change by a. Com)

Steps to create the blog:
Connect with blogger and follow the wizard until you write your first post. When you publish, you have already created your blog and have a web address or url where invite your friends.

Of course I recommend you follow this blog because it is, how to start a blog and what aspects should be given slowly. All items listed on this blog are explained in subsequent entries. We will see interesting subjects like button "Like" on Facebook at each entrance or how to put social icons and even a music player.

The Scrolling Social Bookmark For Blogs

 The scrolling share buttons that sit alongside posts and scroll down the page with the reader.This gadget is popular on all the top blogs and really does help increase the number of times your posts get shared on Twitter, Facebook and other social networks.
scrolling social bookmark

The use of jQuery its attach a bar to the side of your blog posts with bookmarking buttons, as the page scrolls the bar gracely follows giving readers the option to share  the post at any moment.The gadget  has the following options : Twitter Share, Facebook Like, Stumble Upon, Google+, Pinterest Pin It and a Rss Feed Icon.Wordpress.

So Lets Add This Awesome Scroll Bar To Your Blogger Now.

Note:Remember Always Back Up Your Template Before You Make Changes.

Step 1. In Your Blogger Dashboard Click The Drop Down Menu For Your Blog > Choose Template > Then Edit Html > Tick The Expand Widget Templates.

Step 2. Find this piece of code in your blogs Html : (Click Ctrl and F for a search bar to help find the code ).
                                 <b:includable id='post' var='post'>
 Step 3. Copy and Paste next code Directly Below / After <b:includable id='post' var='post'>


 <!--Start Sticky Bar Codehttp://tricksblogspot.blogspot.com/-->
<b:if cond='data:blog.pageType == &quot;item&quot;'>
<div id='share-buttons'><div class='twitter scount'> <a class='twitter-share-button' data-count='vertical' data-via='YOUR-TWITTER-USERNAME' expr:data-text='data:post.title' expr:data-url='data:post.url' href='http://twitter.com/share'>Tweet</a><script src='http://platform.twitter.com/widgets.js' type='text/javascript'/></div><div class='facebook scount'><iframe allowTransparency='true' expr:src='&quot;//www.facebook.com/plugins/like.php?href=&quot; + data:blog.url + &quot;&amp;amp;send=false&amp;amp;layout=box_count&amp;amp;width=80&amp;amp;show_faces=false&amp;amp;action=like&amp;amp;colorscheme=light&amp;amp;font=arial&amp;amp;height=90&quot;' frameborder='0' scrolling='no' style='border:none; overflow:hidden; width:80px; height:90px;'/></div><div class='stumble scount'><script src='http://www.stumbleupon.com/hostedbadge.php?s=5'/></div><div class='gplus scount'> <script src='https://apis.google.com/js/plusone.js' type='text/javascript'/><g:plusone size='tall'/> </div><center><a class='pin-it-button' count-layout='vertical' expr:href='&quot;http://pinterest.com/pin/create/button/?url=&quot; + data:post.url'>Pin It</a>
<a href='javascript:void(run_pinmarklet())' style='margin-left:-46px; width:43px; height:20px; display:inline-block;'/>
<script src='http://assets.pinterest.com/js/pinit.js' type='text/javascript'/>
<script type='text/javascript'>
function run_pinmarklet() {
var e=document.createElement(&#39;script&#39;);
e.setAttribute(&#39;type&#39;,&#39;text/javascript&#39;);
e.setAttribute(&#39;charset&#39;,&#39;UTF-8&#39;);
e.setAttribute(&#39;src&#39;,&#39;http://assets.pinterest.com/js/pinmarklet.js?r=&#39; + Math.random()*99999999);
document.body.appendChild(e);
}
</script> </center><br/><a href='http://feeds.feedburner.com/tricksblogspot.blogspot.com' rel='nofollow' target='_blank' title='Subscribe To Our Rss Feed'><img src='https://blogger.googleusercontent.com/img/b/R29vZ2xl/AVvXsEiZ4EywCBya-TpR75oYCgE6bVewdChHNemo1m1_yiSByuiftbBv5hlHB8rm7nNOd95vjsV2HXYak45W4-eup9nd8YTkT84LqWNo8Xu4JL-L_OuRSj_lRIk6pYilG6ABhlPrRXDkEYYEsak/s1600/rss-seat.png'/></a>
<br/><a href='http://www.spiceupyourblog.com/2012/05/jquery-scroll-bar-social-bookmark.html' target='_blank' title='Get This Scrolling Bookmark Gadget For Blogger'><small>Get Gadget</small></a></div></b:if>
<!--End Sticky Bar Code http://tricksblogspot.blogspot.com/-->

Note:Replace Your-Twitter-Username with your Twitter URL and the URL in yellow with your Rss Feed URL.

Step 4. Find the following piece of code in your blogs Html : (Click Ctrl and F for a search bar to help find the code: ]]></b:skin>


Step 5. Now Copy And Paste This Code Directly Above / Before ]]></b:skin>

 /*Start Sticky Bar Css http://tricksblogspot.blogspot.com/*/
#share-buttons {
background: none repeat scroll 0 0 #fff;
border: 1px solid #CCCCCC;
left: -80px;
padding: 8px;
position: absolute;
-moz-border-radius: 6px;
-webkit-border-radius: 6px;
-goog-ms-border-radius: 6px;
border-radius: 6px;

}
#share-buttons .scount{
clear: both;
display: block;
margin: 2px auto;
text-align: center;
width: 55px;z-index:-1;
}
.facebook.sbutton .fb_ltr{width:40px !important;}
.post-outer{height:auto;}
#main{position:relative;}
#main-wrapper{position:relative;}
/*End Sticky Bar Css http://tricksblogspot.blogspot.com/*/

 Step 6. Find the following piece of code in your blogs Html : (Click Ctrl and F for a search bar to help find the code.
                                                          </head>


 Step 7. Copy And Paste The Following Code Directly Above / Before </head>

Note - The line of code in Yellow is the jQuery script.If you previously added jQuery to your template you do not need to again.

 <!--Start Sticky Bar Scripts http://tricksblogspot.blogspot.com/-->

<script src='https://ajax.googleapis.com/ajax/libs/jquery/1.6.4/jquery.min.js' type='text/javascript'/>
<script src='https://apis.google.com/js/plusone.js' type='text/javascript'/>
<script src='http://yourjavascript.com/4701293254/share-bar-script.js' type='text/javascript'/>
<script type='text/javascript'>
$(document).ready(function () {
$(&#39;#share-buttons&#39;).stickySidebar({speed: 300, constrain: true})

});
</script>
<!--End Sticky Bar Scripts http://tricksblogspot.blogspot.com/-->


Step 8. Find the following piece of code in your blogs Html : (Click Ctrl and F for a search bar to help find the code.                 
                                                              </head>

 Step 9. Copy And Paste The Following Code Directly Below / After </head>


<!--Start FB Code http://tricksblogspot.blogspot.com/-->
<div id='fb-root'/>
<script>
(function() {
var e = document.createElement(&#39;script&#39;);
e.src = document.location.protocol + &#39;//connect.facebook.net/en_US/all.js#xfbml=1&#39;;
e.async = true;
document.getElementById(&#39;fb-root&#39;).appendChild(e);
}());
</script>
<!--End FB Code http://tricksblogspot.blogspot.com/-->

 Step 10. Save your template.


Enjoy!


Enhanced by Zemanta

Animated Stylish Bookmarks Widget For Blogger Blo

The social bookmarking gadgets and widgets objetive is to catch the eye of visitors and get them bookmarking your blog.

Here i will show you a social bookmarking gadget with a stylish animated effect.This stylish bookmarks gadget a basic share button is placed in the corner of your blog, then on hover 6 icons for the main social bookmarking websites appear in a semicircle.

The buttons that appear are for Pinterest, Google+, Facebook, Twitter, Tumblr and Email.

animated stylish social bookmark gadget

Add This Animated Stylish  Bookmarking Gadget To Your Blog today.

Note:Remember Always Back Up Your Template Before You Make Changes .


To Back Up A Blogger Template follow this Steps.

Step 1. In Your Blogger Dashboard Click The Drop Down Menu For Your Blog > Choose Template > Then Edit Html > Tick The Expand Widget Templates Box .


Step 2. Find the following piece of code in your blogs Html : (Click Ctrl and F for a search bar to help find the code:
</body>

Step 3. Copy and Paste the following code Directly Above / Before </body>
 ---------------------------------------------------------------------------------------------------------------------------------


<!-- Start Shareaholic Stylish Bookmarks script -->
<script type='text/javascript'>
(function() {
var sb = document.createElement(&quot;script&quot;); sb.type = &quot;text/javascript&quot;;sb.async = true;
sb.src = (&quot;https:&quot; == document.location.protocol ? &quot;https://dtym7iokkjlif.cloudfront.net&quot; : &quot;http://cdn.shareaholic.com&quot;) + &quot;/media/js/jquery.shareaholic-publishers-ss.min.js&quot;;
var s = document.getElementsByTagName(&quot;script&quot;)[0]; s.parentNode.insertBefore(sb, s);
})();
</script><small><a href='http://tricksblogspot.blogspot.com/2012/05/animated-stylish-social-bookmark-gadget.html'>Animated Social Gadget</a> - <a href='http://tricksblogspot.blogspot.com'>Blogger And Wordpress Tips</a></small>

<!-- End Shareaholic stylish Bookmarks script -->
------------------------------------------------------------------------------------------------------------------------------
 Step 4. Save Your Template.

Enjoy!


Tuesday, April 2, 2013

Hover Effects to Your Blogger Blog Images

Add  different effects to those photos.The COOL thing about this is you just have to add some jQuery and Css to your template then you can easily add from Five hover effects to add some live to your blog photos.

Lets look through the effects and you can also check out this sample in action here.

The 5 effects will be :

Effect 1 - Popout, this is a basic pop out effect on hover the photos will pop out from the page.
Effect 2 - SliceDown, The image will have an dark overlay and on hover a slice effect reveals the image clearly.
Effect 3 - BoxRandom, The image has a light overlay and on hover the image is revealed by boxes randomly clearing.
Effect 4 - FoldLeft, Once again the image has a light overlay and this time on hover an accordion fold effect reveals the image.
Effect 5 - RainGrowReverse, This time on hover the image is revealed from corner to corner.


Add The PICS Effects To YOUR Blogger

Note:Remember Always Back Up Your Template Before You Make Changes - How To Back Up A Blogger Template

Step 1. In Your (New Design) Blogger Dashboard- Click The Drop Down Menu For Your Blog > Choose Template > Then Edit Html >

Step 2. Find this piece of code in your blogs Html : (Click Ctrl and F for a search bar to help find the code - How To Find Code In Blogger Template Template)

    </head>


Step 3. Copy and Paste the following code Directly Above / Before </head>
---------------------------------------------------------------------------------------------------------------------
    <script src='http://code.jquery.com/jquery-1.7.1.min.js' type='text/javascript'/>
    <script src='http://yourjavascript.com/143237963/jquery.adipoli.min.js' type='text/javascript'/>
    <script type='text/javascript'>
    /*<![CDATA[*/
    jQuery(function($pice){
    $pice('.effect1').adipoli({
    'startEffect' : 'normal',
    'hoverEffect' : 'popout'
    });
    $pice('.effect2').adipoli({
    'startEffect' : 'overlay',
    'hoverEffect' : 'sliceDown'
    });
    $pice('.effect3').adipoli({
    'startEffect' : 'transparent',
    'hoverEffect' : 'boxRandom'
    });
    $pice('.effect4').adipoli({
    'startEffect' : 'overlay',
    'hoverEffect' : 'foldLeft'
    });
    $pice('.effect5').adipoli({
    'startEffect' : 'transparent',
    'hoverEffect' : 'boxRainGrowReverse'
    });

    });
    /*]]>*/

    </script>

Step 4. Find the following piece of code in your blogs Html : (Click Ctrl and F for a search bar to help find the code - How To Find Code In Blogger Template Template)

    ]]></b:skin>


Step 5. Now Copy And Paste This Code Directly Above / Before ]]></b:skin>

    .adipoli-wrapper{position:relative;display:inline-block;margin:auto}
    .adipoli-slice{display:block;position:absolute;z-index:0;height:100%}
    .adipoli-box{display:block;position:absolute;z-index:0}
    .post img{border:0!important;margin:0!important;padding:0!important}
    .adipoli-wrapper>img,.adipoli-before,.adipoli-after{position:absolute;z-index:0}


Step 6. Save your template.

How to Add The Effect To Your Pics

Now we need to add a class tag to pics we want the effect on.So as you seen them on the demo ; if you want to use Effect 1 you add class="effect1" for Effect 2 you add class="effect2" and so on.Below I show were to add this class tag on your pics.

Then if your upload the pics or images directly onto Blogger we have an easy way to add the class.The code below is how the html for an image looks when uploaded to Blogger.

Important - This is when you upload the image in compose mode then switch to html mode.

    <div class="separator" style="clear: both; text-align: center;">
    <a href="https://blogger.googleusercontent.com/img/b/R29vZ2xl/AVvXsEhTspqHJ7VFYX65NEe_ZksRAZ5AaXH-DFXtijn8jEYjisgyQON8ref5VlcY-yFzol_nfQzanSKSPrV3iQS0pBptd6D0IyorWh36L8sVE5K_FOFR44ZWTr49d1YG_afsbG1vHSrf5vG2YxAb/s1600/image-effects-image-2.png" imageanchor="1" style="margin-left: 1em; margin-right: 1em;"><img border="0" src="https://blogger.googleusercontent.com/img/b/R29vZ2xl/AVvXsEhTspqHJ7VFYX65NEe_ZksRAZ5AaXH-DFXtijn8jEYjisgyQON8ref5VlcY-yFzol_nfQzanSKSPrV3iQS0pBptd6D0IyorWh36L8sVE5K_FOFR44ZWTr49d1YG_afsbG1vHSrf5vG2YxAb/s1600/image-effects-image-2.png" /></a></div>


You can see highlighted div class="separator" we change this to div class="effect1" (or effect2 etc..) like this below :

    <div class="effect1" style="clear: both; text-align: center;">
    <a href="https://blogger.googleusercontent.com/img/b/R29vZ2xl/AVvXsEhTspqHJ7VFYX65NEe_ZksRAZ5AaXH-DFXtijn8jEYjisgyQON8ref5VlcY-yFzol_nfQzanSKSPrV3iQS0pBptd6D0IyorWh36L8sVE5K_FOFR44ZWTr49d1YG_afsbG1vHSrf5vG2YxAb/s1600/image-effects-image-2.png" imageanchor="1" style="margin-left: 1em; margin-right: 1em;"><img border="0" src="https://blogger.googleusercontent.com/img/b/R29vZ2xl/AVvXsEhTspqHJ7VFYX65NEe_ZksRAZ5AaXH-DFXtijn8jEYjisgyQON8ref5VlcY-yFzol_nfQzanSKSPrV3iQS0pBptd6D0IyorWh36L8sVE5K_FOFR44ZWTr49d1YG_afsbG1vHSrf5vG2YxAb/s1600/image-effects-image-2.png" /></a></div>


When you add pics or images in html mode or adding externally hosted images your image code will be like this :

    <a href="https://blogger.googleusercontent.com/img/b/R29vZ2xl/AVvXsEhTspqHJ7VFYX65NEe_ZksRAZ5AaXH-DFXtijn8jEYjisgyQON8ref5VlcY-yFzol_nfQzanSKSPrV3iQS0pBptd6D0IyorWh36L8sVE5K_FOFR44ZWTr49d1YG_afsbG1vHSrf5vG2YxAb/s1600/image-effects-image-2.png"><img src="https://blogger.googleusercontent.com/img/b/R29vZ2xl/AVvXsEhTspqHJ7VFYX65NEe_ZksRAZ5AaXH-DFXtijn8jEYjisgyQON8ref5VlcY-yFzol_nfQzanSKSPrV3iQS0pBptd6D0IyorWh36L8sVE5K_FOFR44ZWTr49d1YG_afsbG1vHSrf5vG2YxAb/s1600/image-effects-image-2.png" /></a>


We add the class as shown below :

    <a href="https://blogger.googleusercontent.com/img/b/R29vZ2xl/AVvXsEhTspqHJ7VFYX65NEe_ZksRAZ5AaXH-DFXtijn8jEYjisgyQON8ref5VlcY-yFzol_nfQzanSKSPrV3iQS0pBptd6D0IyorWh36L8sVE5K_FOFR44ZWTr49d1YG_afsbG1vHSrf5vG2YxAb/s1600/image-effects-image-2.png"><img class="effect1" src="https://blogger.googleusercontent.com/img/b/R29vZ2xl/AVvXsEhTspqHJ7VFYX65NEe_ZksRAZ5AaXH-DFXtijn8jEYjisgyQON8ref5VlcY-yFzol_nfQzanSKSPrV3iQS0pBptd6D0IyorWh36L8sVE5K_FOFR44ZWTr49d1YG_afsbG1vHSrf5vG2YxAb/s1600/image-effects-image-2.png" /></a>


For this we used the idea from the Adipoli jQuery Image Hover Plugin.
Enhanced by Zemanta

Get Your 3D Social Icons With Spin 360 degrees

3D Social Icons With the Css rotate when you place your cursor over each icon they spin 360 degrees, they then spin back 360 when the cursor is removed (Cool eh).I also have a slight opacity hover effect on the icons.So in this post I will show you how to add the icons to your blog, linked to your social profiles and feeds.

Add The Social Icons With Css Effects To Your Blog Like This sample:


IconIconIconIconFollow Me on Pinterest

spice up your blog

OK so I have two tutorials, one for Blogger and one for Wordprtess.

Wordpress Tutorial


1) In Your Wordpress Dashboard Click 'Apperance' > 'Widgets' > Add A text Widget to your sidebar and paste in the code

Widget Code
--------------------------------------------------------------------------------------------------------------------------
   <style> #social a:hover {background-color: transparent;opacity:0.7;} #social img { -moz-transition: all 0.8s ease-in-out; -webkit-transition: all 0.8s ease-in-out; -o-transition: all 0.8s ease-in-out; -ms-transition: all 0.8s ease-in-out; transition: all 0.8s ease-in-out; } #social img:hover { -moz-transform: rotate(360deg); -webkit-transform: rotate(360deg); -o-transform: rotate(360deg); -ms-transform: rotate(360deg); transform: rotate(360deg); } </style> <center><div id="social"> <!--Start Rss Icon--> <a title="Grab Our Rss Feed" href="YOUR-FEED-URL-HERE" target="_blank"><img border="0" src="https://blogger.googleusercontent.com/img/b/R29vZ2xl/AVvXsEiiTSOIhGbl5poxLc-5FkrhFTWtEc9ZqEDU9uPUpF2WHcT6U3rLhuhNyzeJGlzY4wxiEfpCh8S_Ot9rsubF7Xrttsf9PU2ev2KuTCUIwKJQ1Qy2ykT-SKwI34S6uRO6aXB6nRrIDc9fbziR/s1600/RSS-48x48.png" style="margin-right:1px;" alt="Icon"/></a> <!--End Rss Icon--> <!--Start Email Rss Icon--> <a rel="nofollow" title="Get Free Updates Via Email" href="YOUR-EMAIL-RSS-URL-HERE" target="_blank"><img border="0" src="https://blogger.googleusercontent.com/img/b/R29vZ2xl/AVvXsEj0Dcn-4uN-Ow6bPyX53a8g5P8LNdatq8MFRaTTPujdyVUr_4-3j2ocDQ20IjLu6qJS5ROLX1C4V6LLRCqIlubiV9aL1K6JQlkuDOvSevgD4w-ZBulX8T4dz1e-ARuZKN9WBE86R6sry_ZW/s1600/RSS-EMAIL-48x48.png" style="margin-right:1px;" alt="Icon"/></a> <!--End Email Rss Icon--> <!--Start Facebook Icon--> <a rel="nofollow" title="Like Our Facebook Page" href="YOUR-FACEBOOK-PAGE-URL-HERE" target="_blank"><img border="0" src="https://blogger.googleusercontent.com/img/b/R29vZ2xl/AVvXsEh62hdjOKdNS9xuS5KCzOGsieixeFMoltP8fjRBhKWphfCRgKZZ1T1Gey8nDRgjx6Hs2-Lyylh9pF6agzqfV0k1rxhsuOJEbwIT0C-Il2SSeQTfr_84YbT4JqgQNA6wJynMaW_b34gXI2s9/s1600/FACEBOOK-48x48.png" style="margin-right:1px;" alt="Icon"/></a> <!--End Facebook Icon--> <!--Start Twitter Icon--> <a rel="nofollow" title="Follow Our Updates On Twitter" href="YOUR-TWITTER-URL-HERE" target="_blank"><img border="0" src="https://blogger.googleusercontent.com/img/b/R29vZ2xl/AVvXsEi6TKBaHcvx-8KYCF3ddSX65kMISoBqOlpVfLz-rKK04p9Bo4MNf_gwUjV2EiwfKHSrJfLRxK6UofoVEdZHUf1k1zVleQcwt0Ah-f9ITlaIKo1CByBB6Vaex6fR3_ByXz3YIFzIZV07eMc8/s1600/TWITTER-48x48.png" style="margin-right:1px;" alt="Icon"/></a> <!--End Twitter Icon--> <!--Start Google+ Icon--> <a title="Follow Us On Google+" rel="nofollow" href="YOUR-GOOGLE-PLUS-URL-HERE" target="_blank"><img style="margin-right:1px;" src="https://blogger.googleusercontent.com/img/b/R29vZ2xl/AVvXsEgx6pJcZAo24I7Azo43W1nocI_c3vuffo6TSMSxsFBP13fJ4-zQnLpvFSSIvHwEy-ChZIn5MFbPR9LYdcvA_60WH0wjNJbZ-AWa23ySe_9_fOe1U36dM5rpSvhoqkIXuPxl0mWBa4vqosOg/s1600/GOOGLE-PLUS-48x48.png"/></a> <!--End Google+ Icon--> <!--Start Pinterest Icon--> <a title="Follow Our Pins" rel="nofollow" href="YOUR-PINTEREST-URL-HERE" target="_blank"><img style="margin-right:1px;" src="https://blogger.googleusercontent.com/img/b/R29vZ2xl/AVvXsEj1xi0QuRG7gJFjsA7UTY5JoBzm900BmM-YTd33XOOsAd9euBgbIjz7Sne59O7FuUpYUj_UaAzfIIN2bH6Dr8dWYlF8aSzvAHoqT8fBpqZHROvAdx0eyAi9wRFbI7sgBJpNzDaJRWei_zyA/s1600/PINTEREST-48x48.png" alt="Follow Me on Pinterest" /></a> <!--End Pinterest Icon--> </div><br/> <!--Start Feed Count Button--> <a href="YOUR-FEEDBURNER-URL-HERE" target="_blank"><img alt="spice up your blog" src="http://feeds.feedburner.com/~fc/spiceupyourblog?bg=ff9933&fg=000000&anim=1" style="border:0" /></a><!--End Feed Count Button--> </center>
------------------------------------------------------------------------------------------------------------------------

Important - Replace the yellow sections with your social profiles and feed URLs.

Note - If your familiar with Wordpress you can off course add the Css to your theme stylesheet.

Remove some of the icons - I have the code for each icon between tags like this <!--Start Rss Icon-->Code here<!--End Rss Icon-->>, to remove an icon remove the code between the tags.So for pinterest you will remove the code between the Start Pinterest and End Pinterest tags etc...

Blogger Tutorial

1) In the new Blogger dashboard click the drop down menu for your blog > Choose 'Layout' > Click 'Add A Gadget' > Choose 'Html Javascript' > Paste In The Following Code as shown in the video :


Widget Code:
------------------------------------------------------------------------------------------------------------------------

    <style> #social a:hover {background-color: transparent;opacity:0.7;} #social img { -moz-transition: all 0.8s ease-in-out; -webkit-transition: all 0.8s ease-in-out; -o-transition: all 0.8s ease-in-out; -ms-transition: all 0.8s ease-in-out; transition: all 0.8s ease-in-out; } #social img:hover { -moz-transform: rotate(360deg); -webkit-transform: rotate(360deg); -o-transform: rotate(360deg); -ms-transform: rotate(360deg); transform: rotate(360deg); } </style> <center><div id="social"> <!--Start Rss Icon--> <a title="Grab Our Rss Feed" href="YOUR-FEED-URL-HERE" target="_blank"><img border="0" src="https://blogger.googleusercontent.com/img/b/R29vZ2xl/AVvXsEiiTSOIhGbl5poxLc-5FkrhFTWtEc9ZqEDU9uPUpF2WHcT6U3rLhuhNyzeJGlzY4wxiEfpCh8S_Ot9rsubF7Xrttsf9PU2ev2KuTCUIwKJQ1Qy2ykT-SKwI34S6uRO6aXB6nRrIDc9fbziR/s1600/RSS-48x48.png" style="margin-right:1px;" alt="Icon"/></a> <!--End Rss Icon--> <!--Start Email Rss Icon--> <a rel="nofollow" title="Get Free Updates Via Email" href="YOUR-EMAIL-RSS-URL-HERE" target="_blank"><img border="0" src="https://blogger.googleusercontent.com/img/b/R29vZ2xl/AVvXsEj0Dcn-4uN-Ow6bPyX53a8g5P8LNdatq8MFRaTTPujdyVUr_4-3j2ocDQ20IjLu6qJS5ROLX1C4V6LLRCqIlubiV9aL1K6JQlkuDOvSevgD4w-ZBulX8T4dz1e-ARuZKN9WBE86R6sry_ZW/s1600/RSS-EMAIL-48x48.png" style="margin-right:1px;" alt="Icon"/></a> <!--End Email Rss Icon--> <!--Start Facebook Icon--> <a rel="nofollow" title="Like Our Facebook Page" href="YOUR-FACEBOOK-PAGE-URL-HERE" target="_blank"><img border="0" src="https://blogger.googleusercontent.com/img/b/R29vZ2xl/AVvXsEh62hdjOKdNS9xuS5KCzOGsieixeFMoltP8fjRBhKWphfCRgKZZ1T1Gey8nDRgjx6Hs2-Lyylh9pF6agzqfV0k1rxhsuOJEbwIT0C-Il2SSeQTfr_84YbT4JqgQNA6wJynMaW_b34gXI2s9/s1600/FACEBOOK-48x48.png" style="margin-right:1px;" alt="Icon"/></a> <!--End Facebook Icon--> <!--Start Twitter Icon--> <a rel="nofollow" title="Follow Our Updates On Twitter" href="YOUR-TWITTER-URL-HERE" target="_blank"><img border="0" src="https://blogger.googleusercontent.com/img/b/R29vZ2xl/AVvXsEi6TKBaHcvx-8KYCF3ddSX65kMISoBqOlpVfLz-rKK04p9Bo4MNf_gwUjV2EiwfKHSrJfLRxK6UofoVEdZHUf1k1zVleQcwt0Ah-f9ITlaIKo1CByBB6Vaex6fR3_ByXz3YIFzIZV07eMc8/s1600/TWITTER-48x48.png" style="margin-right:1px;" alt="Icon"/></a> <!--End Twitter Icon--> <!--Start Google+ Icon--> <a title="Follow Us On Google+" rel="nofollow" href="YOUR-GOOGLE-PLUS-URL-HERE" target="_blank"><img style="margin-right:1px;" src="https://blogger.googleusercontent.com/img/b/R29vZ2xl/AVvXsEgx6pJcZAo24I7Azo43W1nocI_c3vuffo6TSMSxsFBP13fJ4-zQnLpvFSSIvHwEy-ChZIn5MFbPR9LYdcvA_60WH0wjNJbZ-AWa23ySe_9_fOe1U36dM5rpSvhoqkIXuPxl0mWBa4vqosOg/s1600/GOOGLE-PLUS-48x48.png"/></a> <!--End Google+ Icon--> <!--Start Pinterest Icon--> <a title="Follow Our Pins" rel="nofollow" href="YOUR-PINTEREST-URL-HERE" target="_blank"><img style="margin-right:1px;" src="https://blogger.googleusercontent.com/img/b/R29vZ2xl/AVvXsEj1xi0QuRG7gJFjsA7UTY5JoBzm900BmM-YTd33XOOsAd9euBgbIjz7Sne59O7FuUpYUj_UaAzfIIN2bH6Dr8dWYlF8aSzvAHoqT8fBpqZHROvAdx0eyAi9wRFbI7sgBJpNzDaJRWei_zyA/s1600/PINTEREST-48x48.png" alt="Follow Me on Pinterest" /></a> <!--End Pinterest Icon--> </div><br/> <!--Start Feed Count Button--> <a href="YOUR-FEEDBURNER-URL-HERE" target="_blank"><img alt="spice up your blog" src="http://feeds.feedburner.com/~fc/spiceupyourblog?bg=ff9933&fg=000000&anim=1" style="border:0" /></a><!--End Feed Count Button--> </center>

-----------------------------------------------------------------------------------------------------------------------
Important - Replace the yellow sections with your social profiles and feed URLs.

Remove some of the icons - I have the code for each icon between tags like this <!--Start Rss Icon-->Code here<!--End Rss Icon-->>, to remove an icon remove the code between the tags.So for pinterest you will remove the code between the Start Pinterest and End Pinterest tags etc...
Enhanced by Zemanta

Botones Isometricos de Social Media


Barra Lateral Fija