Welcome Enjoy Tutorials

Liked us?

Showing posts with label Searching. Show all posts

Wednesday, May 1, 2013

Create A Contact Form For Blogger

In our blog we've created multiple entries, so we connected with Google Analytics and have sent the Sitemap with WebMaster Tools. Now we will add a new element extremely important, a contact form ...
To achieve this new goal we will use another Google service, called Google Docs. This service allows you to create and share through Internet text documents, spreadsheets, slide presentations, drawings and forms.

The form designer Google Docs so we will create a number of fields such as name, email, comments and finally provides the HTML code, integrate into a new blog page.

Create and insert a contact form on the blog

Step 1. Connect to Google Docs
Step 2. If the user interface is in English you follow these steps:

    Click top right where the settings icon
    Click the Settings Documents menu
    Sets the Spanish language and time zone. Click save.


Step 3. Use the button "create new" and indicates that it is a form
Step 4. Design your form with standard fields, you can dial even mandatory.
Step 5. Each field you think you can assign a type (text, paragraph, list, checkbox, etc.)
Step 6. Top right, you have a button "More Actions", select "Insert"
Step 7. Copy the code, return to blogger
Step 8. Create a new page (not post) with the title "Contact"
Step 9. In the "Edit HTML" editing paste the code copied from the form
Step 10. Save the page and verify that it works

Notes: If you have a page navigation menu, the new page will automatically be added as it is at this blog. If not, write to link to the new page and put the link in a prominent blog.

You can further improve the design of the form (new fields, template ...) and this is automatically updated in our blog page.

Enabling email notifications
For every form submitted, the system creates a new record in a spreadsheet automatically. Follow these steps to configure the notification system and alert you by email that you have a new contact.

    Go back to Google Docs and click on the Excel sheet associated with the form contact
    Go to the Tools menu and click Notification Rules ...
    Mark the options as shown in the following graph:
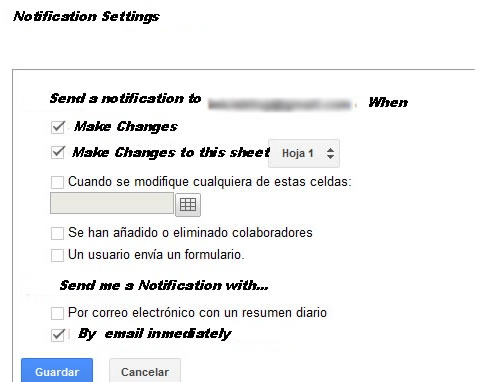
notificaton form

Once configured the notifications just have to run a test yourself ... filled the form.


If you had any questions or problems leave comment in this same e
Enhanced by Zemanta

Tuesday, April 30, 2013

Google Analytics For Statistics Blog

Google Analytics is a free service of Google analytics specialist websites using automatic data collection from visitors. Will be able to inform us about the number of visits, average time of the same, the pages viewed, unique visitors, visitor loyalty, location of users and so on.

What is the purpose of this tutorial?
If you've never used Google Analytics, the goal is to register an account and then ownership of your website / Blog. If you wore it before, you just need to add a new property. In both cases, we have to integrate a tracking code on the blog, which will collect all the information necessary to produce the statistics.

Do I really need if I just start the blog?

It is highly recommended, it is a necessity, even if your blog takes only a few days and visits published is not what you care about is more important for the future leave this task done from the beginning. Of course if your blog takes more time is urgent and you have the necessary configuration.
Tutorial. Steps to register your blog on Google Analytics
Step 1 and 2 of the tutorial is conditional on whether or not you were already user of Google Analytics.
1. Case 1. I am new, I never used Google Analytics
google analysis dashboard

    Access to Google Analytics
    Then it will show a wizard.
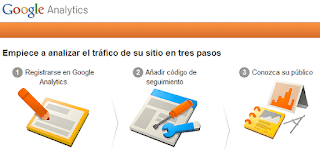
The first step is to register your account see image in step 1. After filling the data, press the Create Account button and continue at step 3 of this tutorial.

Two. Case 2. I already had an account set up in Google Analytics

    Access to Google Analytics
    Upon entering, select your account
    Click add new property. See display this step. Click the Create button property to subsequently obtain the tracking code.

Three. Get the tracking code (common for both cases)

    On the tracking code. Copy the code by right-clicking or Ctrl C provided on this page and go to siquiente step.

April. Paste the tracking code on the Blog

    Access Blogger
    Click Template tab
    Make a backup by clicking the "Create Backup / Restore"
    Click the Edit HTML button
    Click the Continue button
    Press the key combination Ctrl F or Ctrl B (Mac ⌘ ⌘ F or B) and looking
    Tracking code paste previously obtained just above the line found
    Save, view your blog, you should not be anything unusual

Once these steps, wait 24 hours and returns to access Google Analytics in order to verify that you are data on visits to your blog.

Enhanced by Zemanta

Wednesday, April 3, 2013

What is a blog and what is for?

Image representing Blogger as depicted in Crun...
Image via CrunchBase
What is a Blog?
A blog is nothing more nor less than a diary. This diary can be personal or have a more commercial and corporate.

Every time you write something new you do it in a new page or what is called Post or input. , The most important is the content, quality and should be attractive both in substance and in form.

What things do I can write on the blog?

    On products, news, events and milestones of your store or business.
    About gardening, photography, sports, crafts, mechanics.
    On technology, travel, fashion, news, poetry, art, music, cinema.
    About family, children.

In each entry as part of the text, you can insert photos, videos and audio.

Which is more important the content or design of the blog?
Certainly both are important but should give priority to the content must be original content as I said before (no copies) and quality. You must be clear about what to write, who you're going to lead, shape and purpose of the blog. Finally you must be consistent and write if not every day in several a week. Actually the latter is the most important, how to write or who the wrath perfected over time. With regard to design what angers slowly improving but can not be the priority.

Google Blogger 
Now you need a manager for the blog, and that is when I introduce Google Blogger. This service (Blogger), you can create blogs, create and edit entries or post, customize the design of it, you can configure it to indicate whether such a blog is public or private to certain people ... The most important thing, so free and also over time your post will appear in the Google search engine.

Therefore we conclude that a blog is the most economical way to have an Internet presence, and is applicable to all whether you are an individual, entrepreneurial, independent or company. If you want to create a blog user community should be the focus of your strategy.

What do I need to create a blog?
Enthusiasm for what you are going to undertake and dedication to keep
A Gmail (Google Mail). If not, you can create it from here.

You do not need:
No need to know HTML or Web programming.
You do not need a hosting (hosting) and it gives you Google for free.
You do not need a domain, when you create your blog Google assigns you one free on the start. Example www.one.blogspot.com (later you can change by a. Com)

Steps to create the blog:
Connect with blogger and follow the wizard until you write your first post. When you publish, you have already created your blog and have a web address or url where invite your friends.

Of course I recommend you follow this blog because it is, how to start a blog and what aspects should be given slowly. All items listed on this blog are explained in subsequent entries. We will see interesting subjects like button "Like" on Facebook at each entrance or how to put social icons and even a music player.

Monday, April 1, 2013

How to take advantage of Google+ followers gadget in Blogger

But now you can add a gadget in Blogger which displays the profile picture and the number of people you have in your circles in Google+, and facilitates action follow through Google's social network.

In this article we will see how to add it to your blog, as well as a series of tips to make the most of.

 Notable Features
It is a visual element that will highlight your blog.
Clearly draw the attention of those who visit you. Below I outline some of the key features:

    Who visits your blog, you allow follow easily using the button Add to circles
    Shows profile pictures of some of those people with link to their respective profiles. This makes your reader that you know your community and add more people to your circles.
    Displays a counter of the number of people who follow you
    Facilitates who visits you access to all the people who follow you through the link at the bottom right
    Also available for those who use dynamic templates.
    Automatically adjusts to the width.
    The high is always a maximum of four rows of photos


How fans show your personal profile or fan page of your company / brand Google+?

This is a key feature that I believe important to note. This gadget is able to display information on your personal profile or business page on Google+. This depends on how you have linked your blog with Google+. To view it should go to the Google+ tab default and whether it is linked to your personal profile page or your brand. It is one of the main differences with LikeBox Facebook and the latter is "only" shows fans a brand page and personal profile.


The new Followers gadget, others retire earlier gadgets

Knowing that this gadget can display information on a Google+ profile, can question you company logo or add me on Google+ gadget (third party) that has become totally obsolete, so cuestionártelos if you had in your blog.
Advice on the position of the followers gadget Google+

Given that it is very visual and invites to follow, ideally situated located in top of the side of the blog, so check out who you have not moved the page to see it. Anyway the Gadget automatically adapts to the width so it fits perfectly to the foot or the head, is a matter of taste and taste. Either vertically or horizontally on the maximum number of rows is four Current transition.

If like me, you have presence on various social networks will have to decide which prevails over, finally mention being combatible with Google Friend Connect gadget and both can be displayed on your blog.

Note: This section does not apply to those who use Blogger dynamic templates, since the position is always floating to the right.

How to add the Google+ followers gadget to blog?

Follow these step:

    Go to the Layout
    Click Add a Gadget
    From the list select followers Google+
    Drag the gadget to the desired
    Save and view your blog

Go try different positions to find the one you think best.
You knew this Gadget? Have you applied for your blog?, Have presence in Google+? Are you one of those who have gone portrayed in this post?
Comment on this post, it is important to know your experience. Thank you.
Enhanced by Zemanta

Sunday, March 31, 2013

Google Analytics to learn Statistics Blog

Google Analytics Hacks
Google Analytics Hacks (Photo credit: Search Engine People Blog)
Google Analytics is a free Google service specializing in web site analytics by automatically collecting data from visitors. It will be able to tell us about the number of visits, average time of the same, page views, unique users, user loyalty, location of users and so on.

What is the purpose of this tutorial?
If you've never used Google Analytics, the goal is to register an account and then ownership of your website / blog. If you wore it before, you just have to add a new property. In both cases, we have to integrate a tracking code in the blog, which will collect all the necessary information to compile statistics.

Is it really necessary if I just start the blog?
It is highly recommended, is a must, but bring your blog published a few days and visits is not the most important concern is you in the future leave this task done from the beginning. Of course if your blog takes more time is urgent and you have available for this configuration.

Tutorial. Steps to register your blog with Google Analytics
Step 1 and 2 of the tutorial is conditional on whether or not you were already user of Google Analytics.
1. Case 1. I'm new, I never used Google Analytics

    Log in to Google Analytics
    Then it will show a wizard. The first step is to register your account picture in step 1. After filling the data, press the Up button and proceed to Step 3 of this tutorial.

2. Case 2. I already had an account set up in Google Analytics

    Log in to Google Analytics
    Upon entering, select your account
    Click add new property. See this step screen. Click the Create button property to subsequently obtain the tracking code.

3. Get the tracking code (common to both cases)

    The display of the tracking code. Copy the code by right-clicking or Ctrl C provided on this page and go to step siquiente.

4. Paste the tracking code on the Blog

    Login to Blogger
    Click Template tab
    Make a backup by clicking the "Create Backup / Restore"
    Click the Edit HTML button
    Click the Continue button
    Press the key combination Ctrl F or Ctrl B (Mac ⌘ ⌘ F or B) and find
    Paste tracking code previously obtained just above the line found
    Save, view your blog should not see anything unusual

Once these steps, wait 24 hours and returns to access Google Analytics in order to verify that the data are already visiting your blog.
Enhanced by Zemanta

Botones Isometricos de Social Media


Barra Lateral Fija